What is macOS Base System?

Summary: This post explains what macOS Base System is and how to solve the reinstallation failure when macOS Base System is the only disk available.
You may notice a volume called macOS Base System or Mac OS X Base System when accessing Disk Utility in Recovery mode, especially when you fail to install the Mac operating system. What is macOS Base System, and how to handle the problems with it? We will give you the answers in this post.
Table of Contents:
- 1. What is macOS Base System?
- 2. macOS Base System Vs. Macintosh HD
- 3. macOS Base System being the Only Disk Available
- 4. FAQ about macOS Base System
What is macOS Base System?
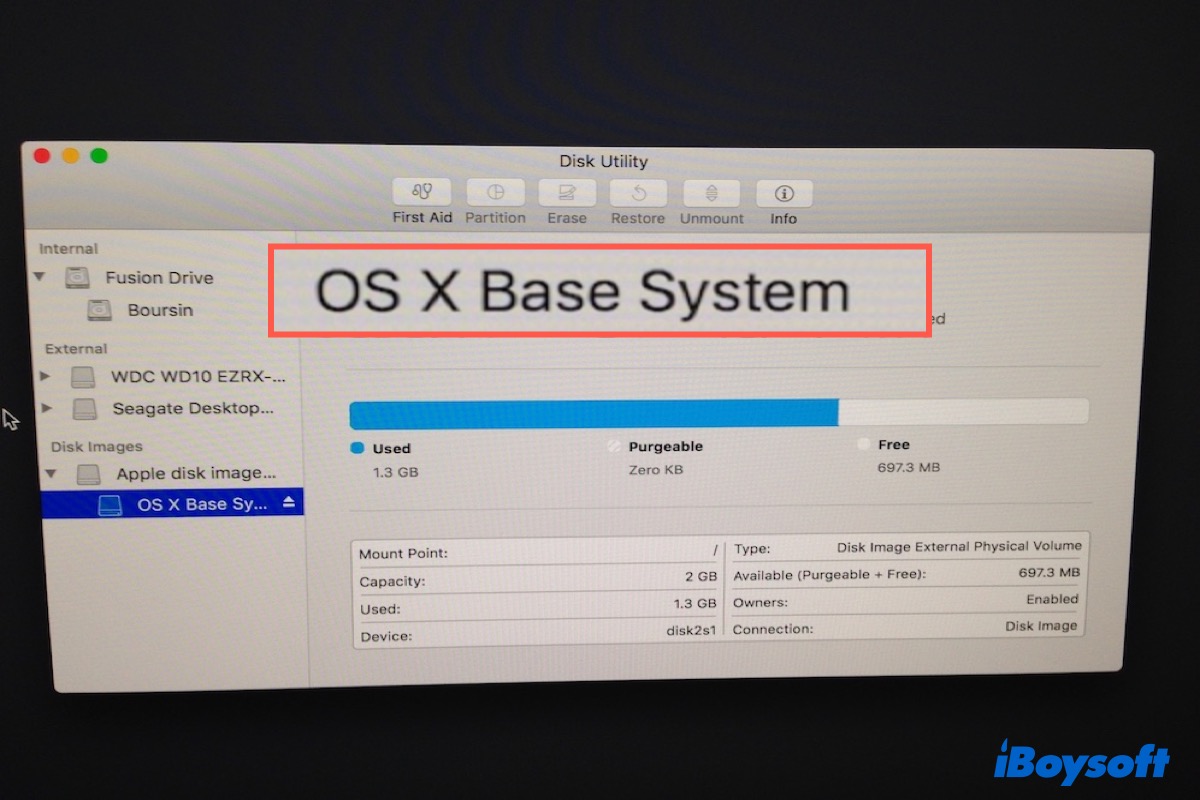
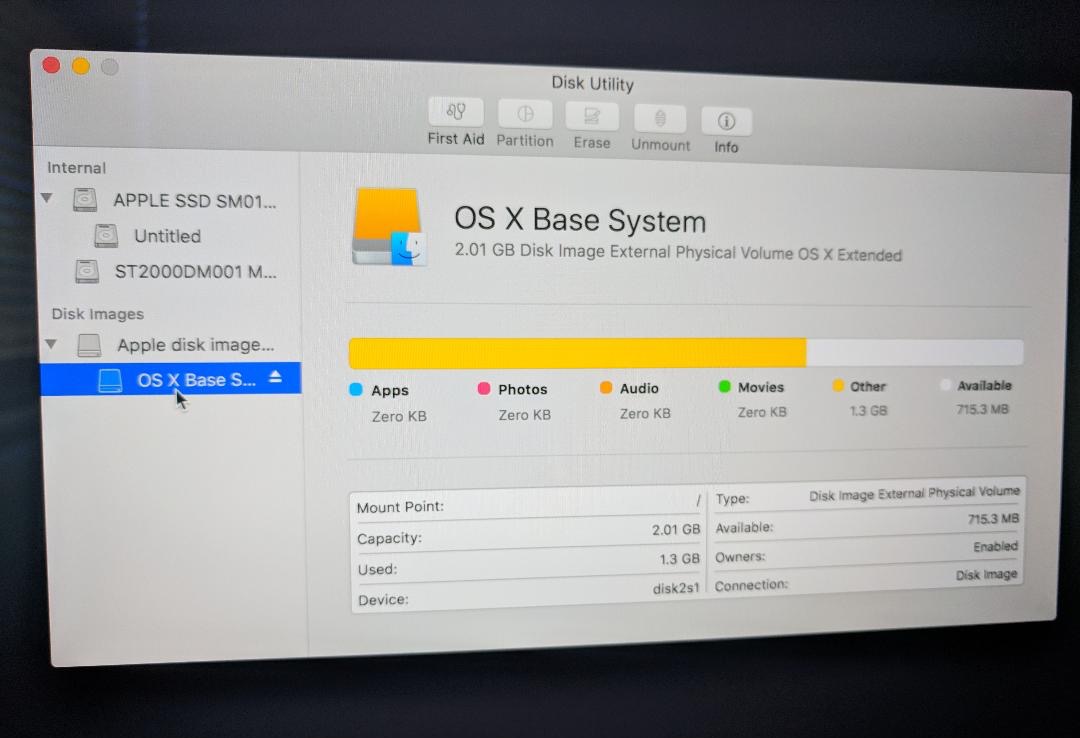
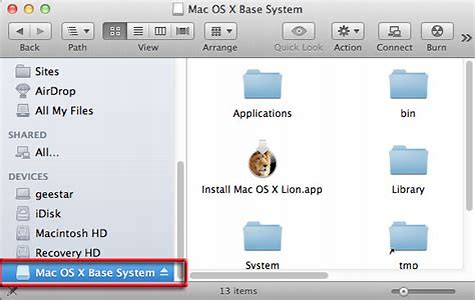
macOS Base System is the recovery partition on your Mac, which allows you to reinstall macOS when your system fails to operate, or a different macOS version needs to be installed. It also helps you troubleshoot and solve Mac problems with Disk Utility, go back to a previous state by restoring from Time Machine.
You can’t see the macOS Base System in a regular boot. It is a read-only disk image around 2 GB in size, which appears when you boot into Recovery Mode with Command + R on Intel-based Macs. It resides all the essential information needed for your Mac to work properly.
macOS Base System Vs. Macintosh HD
Macintosh HD is what you normally boot into when you turn on the Mac, where the macOS resides. macOS Base system is a separate volume that allows you to restore macOS to your Mac with a few clicks when macOS doesn’t work as expected. It’s a backup for users to repair their Mac, reinstall macOS and use other low-level utilities.
macOS Base System being the Only Disk Available
Due to incorrect operations, you may accidentally lose main volumes like Macintosh HD and find macOS Base System the only disk available to store the macOS installer. When you tap on the macOS Base System, you may experience errors indicating a locked drive or no enough space.
Problem 1: There is not enough free space in OS X Base System.
If you use a virtual machine for Mac tool to install macOS, you may encounter the «There is not enough free space on OS X Base System» failure.
It is caused when you don’t have a partition under VMware Virtual SATA Hard Drive Media (use VMware as an example), the container of Mac hard drive. Therefore, you can solve this by erasing the container to add a new partition for storing the macOS installer.
To fix the macOS Base System full problem:
Step 1: On the macOS installer window, click Utilities on the top-left menu bar and choose Disk Utility.
Step 2: Select the main container under the name like VMware Virtual SATA Hard Drive Media and click Erase.
Step 3: Name the partition, select APFS as Format for Mac running macOS 10.13 High Sierra or later. If your macOS version is older than macOS 10.13 High Sierra, choose Mac OS Extended (Journaled) instead. Choose GUID Partition Map as Scheme.
Step 4: Tap on Erase. Then close the window and choose the new partition to install the Mac operating system.
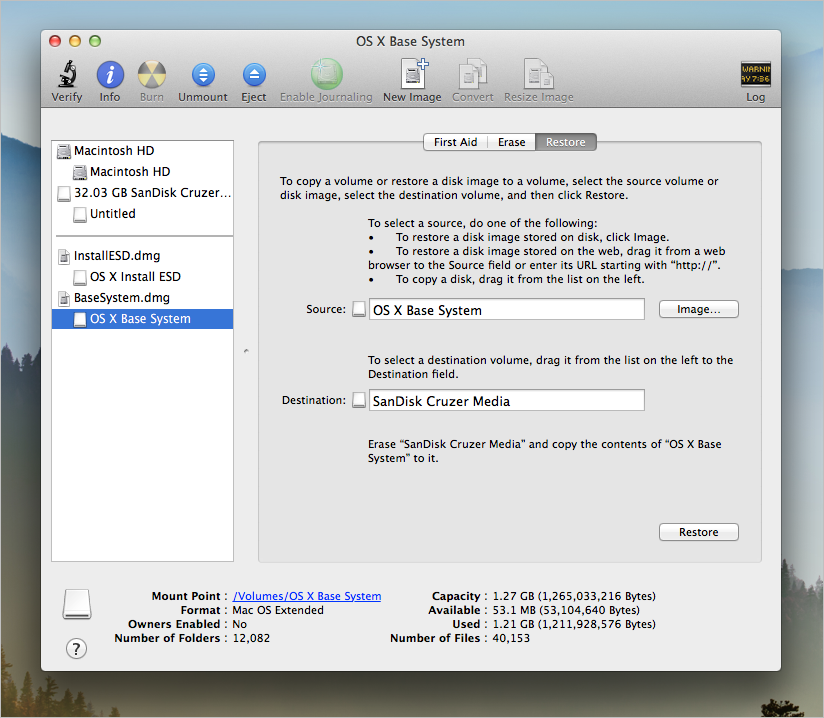
Problem 2: macOS Base System has the size of your Mac hard drive and shows that «The disk is locked.»
For some reason, you may accidentally restore Macintosh HD to macOS Base System and find it locked. In that case, you need to erase the macOS Base System in Internet Recovery mode.
To resolve the «The disk is locked» problem:
Step 1: Restart your Mac and immediately hold down Option + Command + R until you see the animated globe.
Step 2: On the Utilities window, click Disk Utility.
Step 3: Select macOS Base System and click Erase.
Step 4: Name the drive Macintosh HD and make sure the Format is APFS if you are running macOS 10.13 High Sierra or later. Otherwise, choose Mac OS Extended (Journaled). Then choose GUID Partition Map as Scheme.
Step 5: Hit Erase and exit Disk Utility. Then select Macintosh HD as the drive and reinstall macOS.
Note: To install the latest macOS compatible with your Mac: Option + Command + R. To install the macOS that came with your Mac or the closest available one to it: Shift + Option + Command + R.
Other solutions: If you are unable to erase the drive, boot from a USB installer should be able to fix it. Another solution is to restore from Time Machine by connecting your Time Machine backup disk with the Mac.
FAQ about macOS Base System
No, You can’t delete macOS Base System, nor you should. It is what gives you access to the macOS Utilities installed in the recovery partition. Without it, you can’t reinstall operating systems or fix problems when your Mac fails to boot up.
You may wonder whether you should erase the macOS Base System when you are trying a clean reinstallation of Mac operating system or to resale your Mac.
The answer is No. You shouldn’t erase it because it doesn’t occupy much space and doing so will result in your Mac being inoperable. Actually, when you attempt to erase it, you won’t succeed because the option is grayed out.
macOS Base System is the base of the Mac operating system, everything needed to keep your Mac running. It allows you into the recovery partition and accesses some basic tools such as Disk Utility in it.
Jenny is a technical writer at iBoysoft, specializing in computer-related knowledge such as macOS, Windows, hard drives, etc. She’s also been producing top-notch articles for other famous technical magazines and websites.
Jessica Shee is a senior tech editor at iBoysoft. Throughout her 4 years of experience, Jessica has written many informative and instructional articles in data recovery, data security, and disk management to help a lot of readers secure their important documents and take the best advantage of their devices.
Среды recoveryOS и диагностики для компьютера Mac с процессором Intel

Операционная система восстановления recoveryOS полностью отделена от основной macOS, и все ее содержимое хранится в файле образа диска с именем BaseSystem.dmg. Также имеется связанный с ним файл BaseSystem.chunklist, который используется для проверки целостности BaseSystem.dmg. Список фрагментов .chunklist представляет собой серию хэшей для 10-мегабайтных фрагментов BaseSystem.dmg. Прошивка унифицированного расширяемого интерфейса (UEFi) оценивает подпись файла списка фрагментов, а затем поочередно оценивает хэши фрагментов из файла BaseSystem.dmg. помогая убедиться, что они соответствуют подписанному содержимому списка фрагментов. Если один из хэшей не совпадает, загрузка из локальной среды recoveryOS прерывается и прошивка UEFI пытается выполнить загрузку из recoveryOS в интернете.
Если проверка пройдена успешно, прошивка UEFI подключает BaseSystem.dmg в качестве диска оперативной памяти и запускает содержащийся в нем файл boot.efi. Прошивке UEFI не нужно проверять boot.efi, а boot.efi не нужно проверять ядро, поскольку целостность всего содержимого операционной системы уже была проверена, а эти элементы составляют только ее часть.
Диагностика Apple
Процедура загрузки локальной диагностической среды в основном аналогична запуску recoveryOS. При этом используются отдельные файлы AppleDiagnostics.dmg и AppleDiagnostics.chunklist, однако их проверка выполняется так же, как и проверка файлов BaseSystem. Вместо запуска boot.efi прошивка UEFI запускает из образа диска (.dmg) файл с именем diags.efi, который отвечает за вызов ряда других драйверов UEFI, которые могут устанавливать соединение с оборудованием и проверять его на наличие ошибок.
Среды recoveryOS и среды диагностики, загружаемые из интернета
Если при запуске локальной среды восстановления или диагностики произошла ошибка, прошивка UEFI пытается загрузить образы из интернета. (Пользователь также может запросить загрузку образов из интернета, нажав при загрузке особое сочетание клавиш.) Проверка целостности образов диска и списков фрагментов, загруженных с сервера восстановления операционной системы, выполняется таким же способом, как для образов, извлеченных с устройства хранения.
Поскольку подключение к серверу восстановления операционной системы выполняется по протоколу HTTP, все полностью загруженные данные проверяются на целостность (как описано ранее). Таким образом они защищаются от манипуляций, если злоумышленник контролирует сеть. Если отдельный фрагмент не проходит проверку целостности, система запрашивает его 11 раз у сервера восстановления операционной системы, прежде чем прекратить попытки и выдать ошибку.
После того как в 2011 году на компьютеры Mac были добавлены режимы восстановления и диагностики, загружаемые из интернета, было принято решение использовать более простой транспортный протокол HTTP и использовать для аутентификации содержимого механизм списка фрагментов вместо реализации в прошивке UEFI более сложного транспорта HTTPS, что повышает уязвимость прошивки.
What Is macOS Base System [Everything You Need to Know]
![]()
You must have heard of the macOS base system, but do you know the exact function of the macOS Base System and how to fix some wrongs with the macOS base system? Don’t worry; this post will help you learn more. Just keep reading.
The Definition of macOS Base System
macOS base system is the recovery partition on your Mac. When the user needs to reinstall macOS to play a role, this reinstallation of the system mainly occurs when the system does not work or needs to install a different version of macOS. Additionally, the macOS base system can troubleshoot and resolve Mac issues while users are using Disk Utility. If something goes wrong, the device is returned to its previous state by restoring from Time Machine.
The macOS base system is a read-only disk image about 2 GB in size that contains all the basic information your Mac needs to function correctly. The user cannot see the macOS base system on a regular boot, but when the user boots into Recovery Mode using Command + R on an Intel-based Mac, the base system does.
When to Use the Mac Base System
System failure is inevitable when we use a Mac. When your Mac keeps crashing, stopping, or popping up error messages, the device may need to use the base Mac system to assist in restoring or restoring your macOS.
There are several situations in which the Mac base system is used:
- Failed to activate.
- Disk problem.
- Operating system problem.
Therefore, the macOS base system is only considered when the user attempts to restore, restore, or repair the Mac. The macOS base system essentially fixes our Mac’s backup when the device is reinstalled with macOS.
macOS Base System VS Macintosh HD
Macintosh HD is what users launch when they turn on macOS on the device. The macOS base system is a separate volume that allows users to restore macOS to their Mac with just a few clicks when macOS fails to work correctly. The macOS base system is also a backup for users to repair their Macs, reinstall macOS, and use other low-level utilities.
Possible Issues with macOS Base System — How to Solve Them
Equipment can malfunction due to incorrect operation. But it is also possible for users to encounter errors when clicking on the macOS base system, such as showing that the drive is locked or out of space. Below, we will discuss the problems with the basic macOS system and will give solutions.
- 1. There is Not Enough Free Space in OS X Base System
- 2. macOS Base System Has the Size of Your Mac Hard Drive And Shows That ‘The disk is locked’
Problem 1: There is Not Enough Free Space in OS X Base System
When we install macOS using the Mac virtual machine tool, we may encounter glitches like «Not enough free space on OS X Base System» on the device. We can fix this by wiping the container and adding a new partition to store the macOS installer. The following are the detailed steps:
Step 1. In the macOS installer window, click «Utilities» on the menu bar and select «Disk Utility».
Step 2. Select the main container under the name and click «Erase».
Step 3. Name the partition, and select APFS as the Format for Mac running macOS 10.13 High Sierra or later. If your macOS version is earlier than macOS 10.13 High Sierra, choose «Mac OS Extended (Journaled)» instead. Select» GUID Partition Map» as the scheme.
Step 4. Click «Erase.» Then close the window and install the Mac OS to the new partition.
Problem 2: macOS Base System Has the Size of Your Mac Hard Drive And Shows That ‘The disk is locked’
Occasionally, a user may accidentally restore a Macintosh HD to the macOS base system and find the disk locked. The solution to this problem will be given below. Steps to resolve the «disk is locked» issue:
Step 1. You need to restart your Mac and immediately press and hold the «Option + Command + R» buttons on your keyboard until you see an animation appear on the screen.
Step 2. In the utility window, click «Disk Utility».
Step 3. Select the macOS base system and click «Erase».
Step 4. If the device is macOS 10.13 High Sierra or later, you will need to name the drive Macintosh HD and make sure it is formatted as APFS. If the device is not this version, you must choose Mac OS Extended (Journaled). And use the GUID partition map as the scheme.
Step 5. Click «Erase» and exit Disk Utility. Then reinstall macOS and need to select Macintosh HD as the drive.
Восстанавливаем данные в Mac OS X

Это было не легко, но вам это удалось — вы сломали OS X и теперь операционная система вашего Mac отказывается грузиться. При запуске она виснет на логотипе яблочка или вместо него показывает крест. Хотя переустановить OS X не составляет труда, есть одна проблема: на внутреннем жестком диске Mac остались важные файлы, вся ваша работа, ваша жизнь. Просто так переставить с нуля OS X не получится, сначала нужно спасти ваши файлы. Для того, чтобы это сделать вам не потребуется обращаться в сервисный центр, вы можете проделать все самостоятельно. Вам лишь потребуется иметь вместимую флешку или внешний жесткий диск, подключаемый по USB.
Как восстановить файлы, если OS X отказывается загружаться
1. Перезагрузите или включите Mac и зажмите ⌘R во время загузки, чтобы войти в режим восстановления системы.

2. Подключите внешний жесткий диск по USB.
3. В меню окна выберите Утилиты (Utilities) → Терминал (Terminal).

4. Далее вам нужно переместиться в папку пользователя, для этого введите команду (слово Users должно быть с большой буквы):
cd /volumes/Users/ИмяПользоватеяЕсли вы не помните имени пользователя, введите cd /volumes/Users/ и нажмите Tab 2 раза, чтобы посмотреть все доступные имена. Это нужно лишь для того, чтобы вы запомнили имя пользователя, так как оно будет использоваться в следующей команде. В нашем случае имя пользователя Alexander.
4. Теперь нужно узнать имя внешнего USB диска или флешки. Введите следующую команду (Volumes с большой):
ls /Volumes/На экране появятся название всех жестких дисков или их разделов. Например: Macintosh HD, OS X Base System, Toshiba 500 Gb. Наш внешний жесткий диск производства Toshiba, значит «Toshiba 500 Gb» это его название в системе.
5. Зная имя пользователя и название внешнего диска можно начать начать функцию копирования файлов, с помощью команды:
cp -r [источник][назначение]
cp -r /volumes/Users/Alexander /Volumes/Toshiba 500 GbКогда вы нажмете Enter курсор перейдет на новую строку и останется там на продолжительное время. С первого взгляда может показаться что ничего не происходит, однако процесс копирования в терминале не имеет обратной связи и никак не отображает происходящее, пока все файлы не будут полностью скопированы. Если папка вашего пользователя содержала много данных, то копирование на внешний диск может занять десятки минут или даже больше часа. Когда процесс копирования завершится на экране появится новая терминальная строка вида -bash-3.2#
Копирование отдельных файлов
Если копировать всю папку пользоватея вам неудобно или объем внешнего диска или флешки не позволяют сделать это, вы можете переносить папки по очереди. Например, чтобы перенести папку Документы, введите следующую команду:
cp -r /volumes/Users/Alexander/Documents /Volumes/Toshiba 500 Gb/DocumentsПолезные терминальные команды
Вот список полезных терминальных команд, которые могут пригодиться в процессе восстановления:
ls — отобразить содержимое текущей папки. cd /имя_папки — перейти в папку. cd .. — выйти из папки по иерархии выше. cp [источник][назначение] — копирование файла. cp -r [источник][назначение] — копирование из папки в папку.
Первые несколько символов + кнопка Tab нажатая 2 раза — автоматически подставляет название папок и файлов или отображает их список, если на этим символы начинаются 2 или более файла.
Исключения и предупреждение
Такое восстановление является крайней мерой, он позволяет вам самостоятельно восстановить данные из папок пользователя: Рабочий стол, Документы, Музыка, Загрузки, Изображения, Фильмы. Этим способом вы сможете восстановить документы и файлы, которые лежат на вашем жестком диске, но не внутри приложений. Если файлы были частью приложения использующего технологию Sandbox, как, например, книги в приложении iBooks, то восстановить такие файлы будет практически невозможно. В этом случае проще будет восстановить их с iOS устройств, через приложение iExplorer или PhoneView.
Как переустановить OS X с нуля
Если вы завершили копирование файлов и убедились, что не забыли ничего важного, можно преступить к очистке жесткого диска и установке OS X с нуля.
1. Закройте терминал, чтобы вернуться к предыдущему окну.
2. Запустите приложение Дисковая утилита (Disk Utility), в которой выберите ваш внутренний жесткий диск и очистите его через вкладку Стереть (Erase). Закройте Дисковую утилиту, чтобы вернуться к предыдущему окну.
3. Нажмите переустановить OS X (Reinstall OS X) и следуйте советам установщика. OS X будет скачана с интернета, но даже с хорошем интернет-соединением это может занять около часа.
СЦ AppService
Адрес: ул. Антоновича, дом 39 Киев
Телефон: +38 (067) 889-32-31 Сайт: appservice.org.ua
Время работы:
Пн-Пт 10:00-19:00,
Сб 11:00-17:00
Цены: 200-12700 грн.
© 2009-2020 AppService — грамотный ремонт Apple