How to set up your AsusWRT router for Proton VPN using OpenVPN
In this article, we show you how to set up an AsusWRT router to connect to Proton VPN using the OpenVPN VPN protocol. On Asus RT-AXxxx routers, it’s also possible to configure Proton VPN using the WireGuard® protocol.
- Learn how to set up your AsusWRT router for Proton VPN using WireGuard
- Learn about OpenVPN vs. WireGuard
If you encounter any problems, please see the troubleshooting section at the end of the article or contact our Support team.
Please note that Proton VPN only guarantees support for streaming services if you have a Proton VPN Plus, Proton Unlimited, or Visionary (legacy) plan.
Setup instructions differ somewhat, depending on whether you have an Asus RT-ACxxx or an Assus RT-AXxxx router.
- How to set up OpenVPN on AsusWRT RT-ACxxx routers
- How to set up OpenVPN on AsusWRT RT-AXxxx routers
How to set up OpenVPN on AsusWRT RT-ACxxx routers
1. Open your Asus router’s admin panel by typing its local IP address into your browser’s URL bar. By default, the address is 192.168.50.1, but you may have changed it when you set up your router.
If you don’t know your router’s IP address, you can log in using the URL: router.asus.com (as long as you’re not connected to a VPN on the device you’re configuring AsusWRT from). Sign in using your Asus router account.

2. Go to Advanced settings → VPN .

3. Select the VPN Client tab and Add profile .

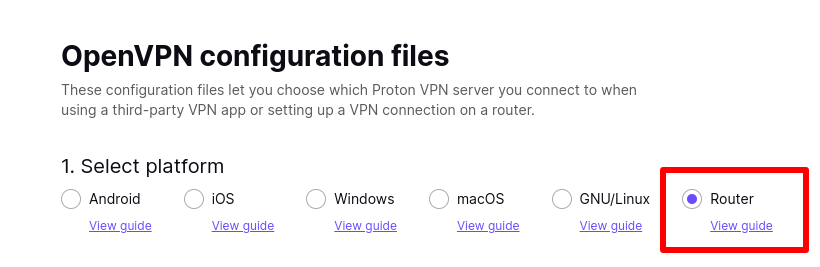
4. Download the OpenVPN configuration file(s) you desire, selecting Router for the platform.
5. Back on your Asus router’s admin page, select OpenVPN and enter the following:
- Description – This can be anything you wish (for example, Proton VPN)
- Username: Your OpenVPN / IKEv2 username
- Password: Your OpenVPN / IKEv2 password
Your OpenVPN / IKEv2 username and password are not your regular Proton VPN username and password. To find your OpenVPN / IKEv2 username and password, log in to account.protonvpn.com and go to Account → OpenVPN / IKEv2 username.
Note: To use our NetShield DNS filtering feature, append the suffix +f1 to your username to block malware or +f2 to block malware, ads, and trackers (for example, 123456789+f2). NetShield is a premium feature available with a Proton VPN Plus, Proton Unlimited, or Visionary (legacy) plan.
After you’ve filled everything in, click the Choose File button and use your system’s file manager to locate the OpenVPN configuration file you downloaded in step 4.

Click Upload to import the OpenVPN profile to your AsusWRT router. You’ll see a Complete notification once this is done. Click OK to complete the setup.
How to connect to Proton VPN
You are now ready to connect to a Proton VPN server and begin browsing securely. Return to the VPN Client page (Advanced settings → VPN) and click the Activate button next to the connection you just set up to establish a VPN connection.

If the connection is established successfully, you will see a blue checkmark under Connection Status.

To confirm that the AsusWRT router VPN setup is complete and the connection is working correctly, visit ip.me in a browser.

To disconnect the AsusWRT VPN connection, visit the VPN Client page and click the Deactivate button.
How to set up OpenVPN on AsusWRT RT-AXxxx routers
1. Open your Asus router’s admin panel by typing its local IP address into your browser’s URL bar. By default, the address is 192.168.50.1, but you may have changed it when you set up your router.
If you don’t know your router’s IP address, you can log in using the URL: router.asus.com (as long as you are not connected to a VPN on the device you’re configuring AsusWRT from). Sign in using your Asus router account.

2. Go to Advanced Settings → VPN → VPN Fusion tab → Add profile.

4. Download the OpenVPN configuration file(s) you desire, selecting Router for the platform.
5. Back on your Asus router’s admin page, fill in the following details:
- Connection Name: This can be anything you wish (for example, ProtonVPN).
- VPN type: OpenVPN
- Username: Your OpenVPN / IKEv2 username
- Password: Your OpenVPN / IKEv2 password
Your OpenVPN / IKEv2 username and password are not your regular Proton VPN username and password. To find your OpenVPN / IKEv2 username and password, log in to account.protonvpn.com and go to Account → OpenVPN / IKEv2 username.
Note: To use our NetShield DNS filtering feature, append the suffix +f1 to your username to block malware or +f2 to block malware, ads, and trackers (for example, 123456789+f2). NetShield is a premium feature available with a Proton VPN Plus, Proton Unlimited, or Visionary (legacy) plan.
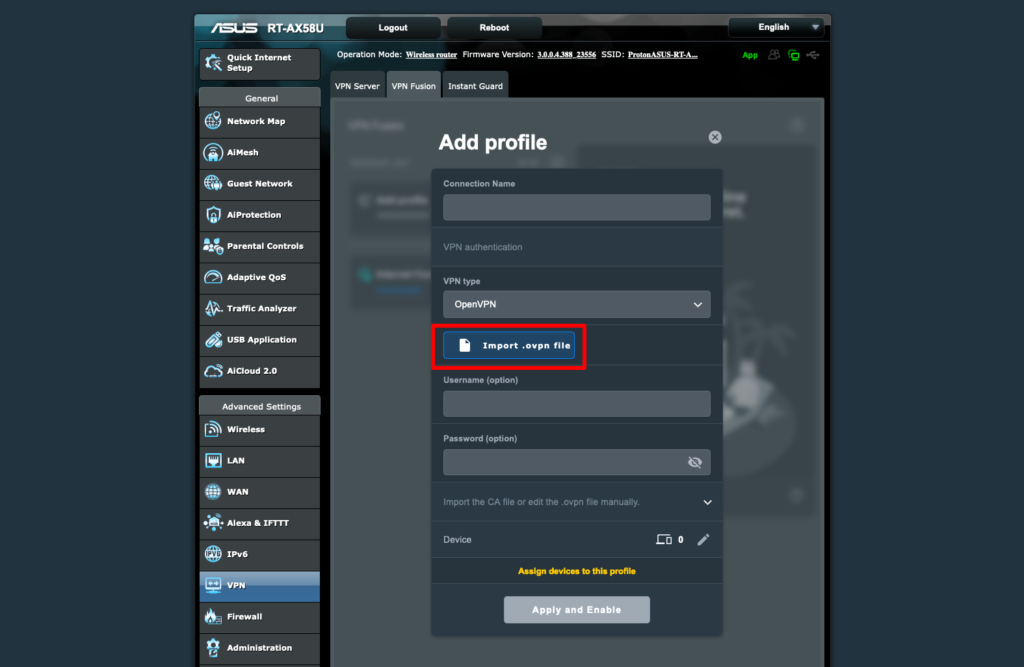
After you’ve filled everything in, click the Import .ovpn file button and use your system’s file manager to locate the OpenVPN configuration file you downloaded in step 4.
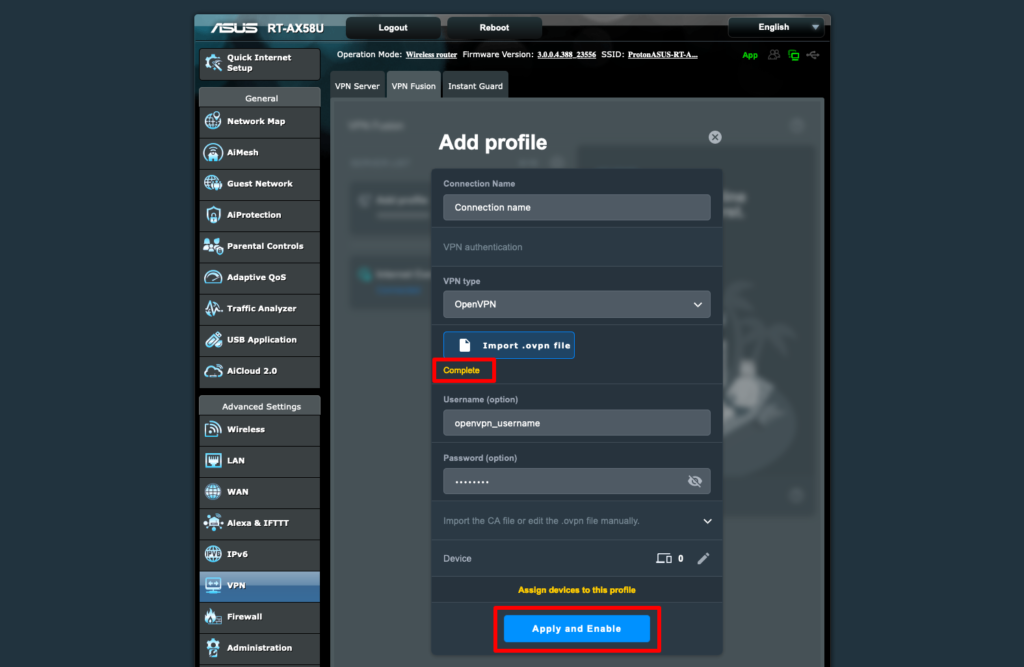
You’ll see a Complete notification once this is done. Click Apply and Enable.
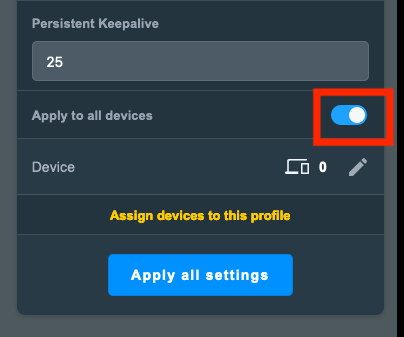
6. Go to Advanced settings → VPN → Profile and toggle the Apply to all devices switch on. This ensures that all connections are routed through the VPN interface. Click Apply all settings to finish setup.
How to connect to Proton VPN
A VPN connection will be established when you first set the connection up and click Apply and Enable.
To connect at a later point, go to Advanced settings → VPN → VPN Fusion tab and toggle the switch next to your new connection on.
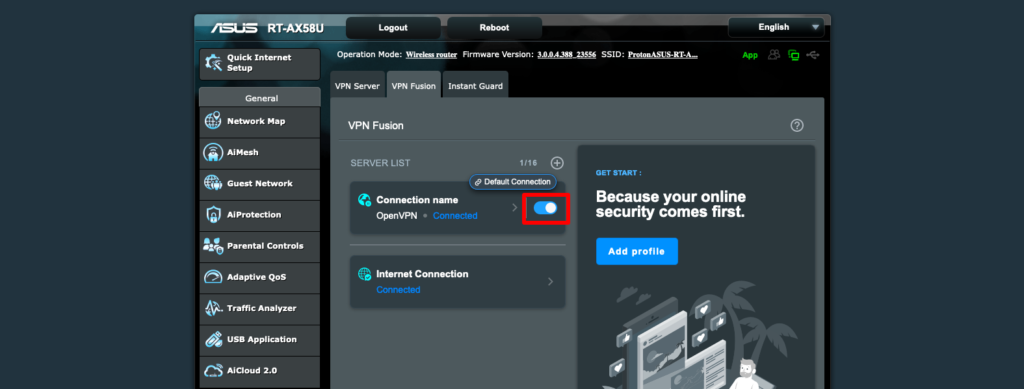
To confirm that the AsusWRT router VPN setup is complete and the connection is working correctly, visit ip.me in a browser.
To disconnect the AsusWRT VPN connection, visit the VPN Fusion page and toggle the switch off.
Troubleshooting
Proton VPN does not support OpenVPN versions earlier than OpenVPN 2.4 because they are no longer considered secure.
However, some AsusWRT routers have firmware that supports OpenVPN versions lower than 2.4. In this case, we recommend upgrading your firmware to the latest official version . To check the OpenVPN version supported by your router’s firmware:
1. Start or restart a VPN connection, as described above ( Deactivate your VPN connection if it is running and then Activate it).
2. Go to Advanced Settings → System log . Scroll to the top of the log and look for the OpenVPN version.

If your OpenVPN version is 2.4+ (or you have updated your firmware and are still encountering problems), you have two options:
- Report the issue to ASUS using its official Security Advisory tool (as using earlier versions of OpenVPN is a security issue).
- Flash your router with alternative secure firmware such as FreshTomato (Proton VPN setup guide here ) or OpenWRT (Proton VPN setup guide here ).
Guide to installing Proton VPN on different routers
There are many advantages to configuring your router to run Proton VPN. These include:
- No need to set up a VPN on each device
- Protects devices that don’t support VPNs
- Automatically secures all your Internet traffic
- Protects your entire household with one device
We don’t recommend you attempt to set up a VPN connection yourself unless you are a tech-savvy user. You cannot set up Proton VPN on any router.
You can install Proton VPN on routers that support OpenVPN or WireGuard as a client (instead of as a server).
Note that routers your Internet service provider gives you will generally not support VPN configurations.
This means you must either find a router that has a VPN client package, which can take some research, or you must “flash” (or install DD-WRT software) on your router, which comes with the risk of rendering your router inoperable if you make a mistake.
However, if you are a tech-savvy user, we have created several guides for the routers and firmware that work with Proton VPN:
Proton VPN router guides
We have partnered with InvizBox to create a router specifically for Proton VPN. This router is open source and configured to connect easily to your Proton account.
- AsusWRT using OpenVPN
- AsusWRT using WireGuard
- AsusWRT-Merlin using OpenVPN
- DD-WRT
- FreshTomato
- Gl.iNet Flint using OpenVPN
- MikroTik using WireGuard
- OpenWRT
- pfSense using OpenVPN
- pfSense using WireGuard
- Vilfo router
FAQ: Proton VPN on routers
Q: Will my connection speed slow down if I set up Proton VPN on my router?
A: That depends on the processing power of your router. If your router cannot handle the additional VPN encryption, then yes, you could see slower speeds.
Q: Will having Proton VPN on my router protect all my connections?
A: The VPN on your router will protect the connections of all devices connected to the router, but not necessarily the connection between the device and the router. The VPN encryption takes place on your router, which means it only applies to the traffic between your router and your Internet service provider. As long as your router is password-protected and you do not have any unknown devices connected to your network, this should not be an issue.
Other local network connections, like a Bluetooth connection between your smartphone and speaker, will not be protected.
Q: Once I set up a VPN on my router, do I need to do anything else?
A: A router, like any other device, needs to be updated regularly to receive the latest security improvements. If they are not updated, routers can become incompatible and stop supporting Proton VPN’s service. This can happen if the router is running an outdated version of OpenVPN (e.g., 2.3) or an old version of the SSL/TLS networking stack. (These examples are taken from user issue reports.)
Keeping your router up to date will help it stay compatible with our servers. When you are selecting a router to install Proton VPN on, you should choose one from a brand with a good track record of keeping its firmware up-to-date.
If you have any questions, please contact our Support team.
How to set up Proton VPN on a DD-WRT router using OpenVPN
You can set up Proton VPN on your router, which will protect every device that connects to the internet through that router. In this guide, we take a step-by-step look at how to set up Proton VPN on a DD-WRT router using the OpenVPN VPN protocol.
We also have guides for setting up Proton VPN on a wide selection of other popular routers.
To skip this setup process, you can purchase a pre-configured router from FlashRouters.
Before starting, you’ll need the following:
- A computer that’s connected to your LAN network so that you can access your DD-WRT router’s web interface. To do this, enter the address provided by your router’s manufacturer into your browser’s URL bar. For example, most Linksys and Asus routers use the address 192.168.1.1.
- Your OpenVPN username and password. These are different from your regular Proton VPN username and password. To find them, sign in to account.protonvpn.com and go to Account → OpenVPN / IKEv2 username.
Note that this guide is for newer versions of DD-WRT. If you’re running an older version of DD-WRT, please update your firmware to the latest version.
How to set up Proton VPN on a DD-WRT router
1. Create an OpenVPN configuration file
Sign in to Proton VPN using your Proton Account username and password at account.protonvpn.com, go to Downloads → OpenVPN configuration files, and download an OpenVPN configuration file. Be sure to Select Platform: Router.
To configure DD-WRT, you’ll need the IP address and port number of the VPN server. These can be found on the first remote line listed in the certificate. The first number is the IP address, and the second number is the port number. In the example below, the IP address is 185.159.157.6, and the port number is 51820

You’ll also need the OpenVPN Static key. This starts with —–BEGIN OpenVPN Static key V1—- and ends with —–END OpenVPN Static key V1—–.

And finally, you’ll need the TLS certificate from this config file. To find it, open the downloaded OpenVPN config file in a text editor and look for the text that starts with —–BEGIN CERTIFICATE—- and ends with –—-END CERTIFICATE—–.

2. Disable IPv6 on your router
This step is recommended to prevent IP leaks.
Open your DD-WRT router’s web interface in a browser window. Go to Setup → IPV6 → IPV6 Support → IPV6 and toggle the Disable button on. Now click Save, then Apply Settings.

3. Configure the OpenVPN service
Go to Services → VPN → OpenVPN Client and configure the following settings:
- Enable Client: Enable
- CVE-1029-14899 Mitigation: Enable
- Server IP / Name: Port: Enter the IP address and port number of the VPN server. These can be found on the first remote line listed in the certificate (see Step 1 for more details)
- Tunnel Device: TUN
- Tunnel Protocol: UDP or TCP. You selected this when you created your OpenVPN configuration files. You can also find it in the config file on the line starting proto.
- Encryption Cipher: AES-256-GCM
- Hash Algorithm: SHA-256
- First Data Cipher: AES-256-GCM
- Second Data Cipher: CHACHA20-POLY1305
- Third Data Cipher: –
- User Pass Authentication: Enable
- Username, Password: Your OpenVPN username and password. Remember: These are different from your regular Proton VPN username and password.
- TLS Cipher: –
- Compression: Disable
- NAT: Enable
- Tunnel MTU Setting: 1500
- Additional Config: paste the following settings into the box:
remote-cert-tls server remote-random nobind mssfix 0 persist-key persist-tun reneg-sec 0
- TLS / Static Key Choice: TLS Crypt
- TLS key: Paste in the OpenVPN Static key from the OpenVPN configuration file (see Step 1)
- CA Certificate: Paste in the TLS certificate from your OpenVPN config file (see Step 1)
To enable additional features, add the following suffixes to your OpenVPN username.
- NetShield Ad-blocker: +f1
- NetShield Ad-blocker advanced (also blocks malware and trackers): +f2
Leave all other options at their default values. When you’re done, click Save, then Apply Settings.

To verify the VPN is working, go to Status → OpenVPN → State. You should see the message: Client: CONNECTED SUCCESS.

You can also test if the VPN is working by visiting ip.me from any device on your network.
How to setup Proton VPN on MikroTik routers using WireGuard
You can set up Proton VPN on your MikroTik router so that all devices that connect to the internet through it are protected by Proton VPN.
In this guide, we show you how to do this using the WireGuard VPN protocol on MicroTik routers running RouterOS 7. This requires a Proton VPN Account
How to set up Proton VPN WireGuard on MikroTik routers (update)
1. Download a WireGuard configuration file
Open it using any text editor.
Note that you can’t use a saved config file. Proton VPN never stores your private keys, so saved config files don’t have them. You must create and download a new config file.
2. Open the MikroTik configuration panel
To do this, open a command line (using Terminal on Linux and macOS or PowerShell on Windows) and enter:
ssh user@192.168.88.1
3. Create a new WireGuard interface
Using the command line, enter the following text and tap . To find your private key, look for the line starting PrivateKey= in the WireGuard config file you downloaded in step 1.
/interface wireguard add listen-port=13231 mtu=1420 name=wireguard-inet private-key=”your private key”
All following steps will involve you entering commands into the command line.
4. Add an IP address to the interface you just created:
/ip address add address=10.2.0.2/30 interface=wireguard-inet network=10.2.0.0
5. Add a WireGuard server as a peer
Add the endpoint address, endpoint port, and public key from the WireGuard config file. Look for the lines starting PublicKey= and Endpoint=.
For example, if the config says Endpoint=103.107.197.2:51820, enter endpoint-address=103.107.197.2 and endpoint-port=51820
/interface wireguard peers add allowed-address=0.0.0.0/0 endpoint-address=x.x.x.x endpoint-port=xxxxx interface=wireguard-inet persistent-keepalive=25s public-key="your public key"
6. Enable masquerade for that interface
Note: This setup assumes that you are using the default local network address used by MikroTik. If you have changed this, use that address for scr-address= instead.
/ip firewall nat add action=masquerade chain=srcnat out-interface=wireguard-inet src-address=192.168.88.0/24
7. Redirect all internet traffic through WireGuard
/ip route add disabled=no distance=1 dst-address=0.0.0.0/1 gateway=10.2.0.1 pref-src="" routing-table=main scope=30 suppress-hw-offload=no target-scope=10 add disabled=no distance=1 dst-address=128.0.0.0/1 gateway=10.2.0.1 pref-src="" routing-table=main scope=30 suppress-hw-offload=no target-scope=10
8. Configure DNS settings
/ip dns set servers=10.2.0.1 /ip dhcp-client set 0 use-peer-dns=no
9. Redirect the WireGuard IP address through main provider’s gateway
Replace x.x.x.x with the endpoint address from the config file (Endpoint=).
/ip route add disabled=no dst-address=x.x.x.x/32 gateway=[/ip dhcp-client get [find interface=ether1] gateway] routing-table=main suppress-hw-offload=no
10. Restart your router
And you’re done! Your router should now protect all internet connections it provides with Proton VPN.