Что использовать для написания андроид приложения на Java?
Здравствуйте, возможно, я задаю крайне глупый вопрос, но помогите мне разобраться. Дело вот в чём: я написал простое приложение в IntelliJ IDEA, зашёл в Android studio для сборки apk, но там не хочет импортироваться swing. Я поискал в интернете и узнал, что swing для андроид приложений нельзя использовать, т.к. у android есть свои механизмы для этого. Но разве это не противоречит фразе «один раз написал — работает на всех платформах»? Можно ли всё-таки использовать swing для андроид приложений? Если нет, то что тогда для этого использовать? Ещё я не совсем понимаю как вообще собирать apk или exe, можно инструкции для «особо одарённых»? Насчёт последнего, в IntelliJ IDEA мне удалось собрать .jar, а как сделать именно .exe?
- Вопрос задан более двух лет назад
- 100 просмотров
Комментировать
Решения вопроса 1

Вообще ничего не понятно! Разработку под Андроид — в Android Studio (чаще всего), но никак не не в IntelliJ IDEA.
Под Андроид можно разрабатывать на Java, но выполнять код будет не JVM, так что не понятно при чем здесь «один раз написал — работает на всех платформах»
Можно ли всё-таки использовать swing для андроид приложений?
Если нет, то что тогда для этого использовать?
мне удалось собрать .jar, а как сделать именно .exe?
Вопрос точно все еще про Андроид?
Ещё я не совсем понимаю как вообще собирать apk
Ответ написан более двух лет назад
amimamoya @amimamoya Автор вопроса
Ответ удовлетворительный, спасибо. «мне удалось собрать .jar, а как сделать именно .exe?» нет, не про андроид, понятное дело, решил заодно задать этот небольшой вопрос.
Денис Загаевский @zagayevskiy Куратор тега Java
Для IntelliJ IDEA есть android plugin, и большие команды разрабатывают именно там, а не в студии. тормозит меньше.
Ответы на вопрос 2

Орхан Гасанлы @azerphoenix Куратор тега Java
Java Software Engineer
Дело вот в чём: я написал простое приложение в IntelliJ IDEA, зашёл в Android studio для сборки apk, но там не хочет импортироваться swing.
Вы можете и не заходить в Android Studio. Можно собрать apk и в IDEA. Другое дело, что вы пытаетесь скрестить ужа с ежом, пытаясь использовать swing в андроид.
В теории можно конечно же swing запустить на android, вопрос в том, а надо ли так изворачиваться. Однозначно, нет. Ну а если дело принципа, то — вот решение
Насчёт последнего, в IntelliJ IDEA мне удалось собрать .jar, а как сделать именно .exe?
Ответ написан более двух лет назад
Комментировать
Нравится Комментировать
Я слышал, что вместо swing в андроид используется activity, и в него что-то там с xml писать надо, но ето неточно.
Ответ написан более двух лет назад
Денис Загаевский @zagayevskiy Куратор тега Java
А ты с какой целью сюда пишешь?
Денис Загаевский, люблю помагать другим
Ваш ответ на вопрос
Войдите, чтобы написать ответ

- Java
- +2 ещё
Как добавить Hibernate в логи?
- 1 подписчик
- 3 часа назад
- 25 просмотров
Как это собрать приложение на android за 15 минут

Для многих создание приложение — это что-то сверх силы. Но это приложение можно написать и за пару минут. Давно уже известно про написание приложений на HTML5. Последний раз, когда делал подобное, производилось множество манипуляций подключения различных библиотек и сборки на Eclipse. Сейчас приложение можно собрать из консоли одной командой cordova build.
Наша задача
За пару минут до прихода любимой сделать ей приятный сюрприз. Хорошо, когда ваши фото лежат с подписями к датам и тегами, описавшими дату. Подбираем нужные фото и начинаем делать приложение… но времени у нас мало и опыта в мобильной разработки нет, поэтому сделаем на html5 и упакуем cordova.
- JDK 6 (отсутствие этой версии посыпит ошибки)
- Android SDK
- NodeJs (на написание статьи 0.12.0)
- cordova (на написание статьи 4.3.0)
- Apache Ant (на написание статьи 1.8.4)
- IntelliJ IDEA (на написание статьи 14.0.1)
Хорошо что всё уже стояло единственно установкой для меня был cordova.
Установки компонентов
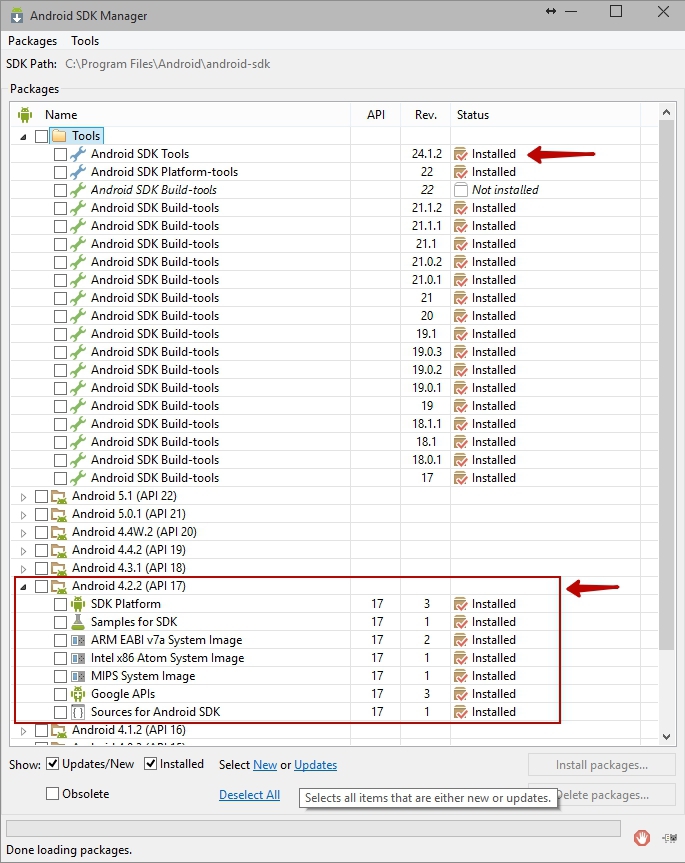
1) JDK можно скачать из архива oracle
2) Android SDK Tools не меньше 21v и соответственно версия adnroid под которую будем писать:
проверяем PATH адреса на SDK
3) NodeJs:
npm install –g ant // check ant version ant -v если версии не показывает то необходимо прописать PATH 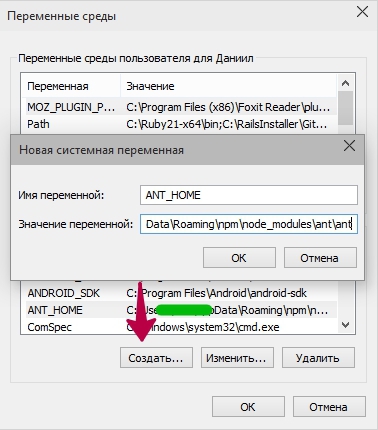
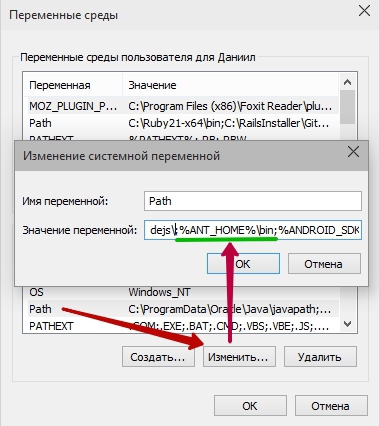
Name : ANT_HOME Value : C:\Users\\AppData\Roaming\npm\node_modules\ant\ant PATH value : ;%ANT_HOME%\bin npm install -g cordova После того, как у нас всё необходимое есть, создаём новый проект.
Создание проекта
При первом же запуске устанавливаем плагин:

Перезагружаем IDE и потом заходим также в настрйоки:
Settings → Languages and Frameworks → JavaScript → PhoneGap/Cordova.
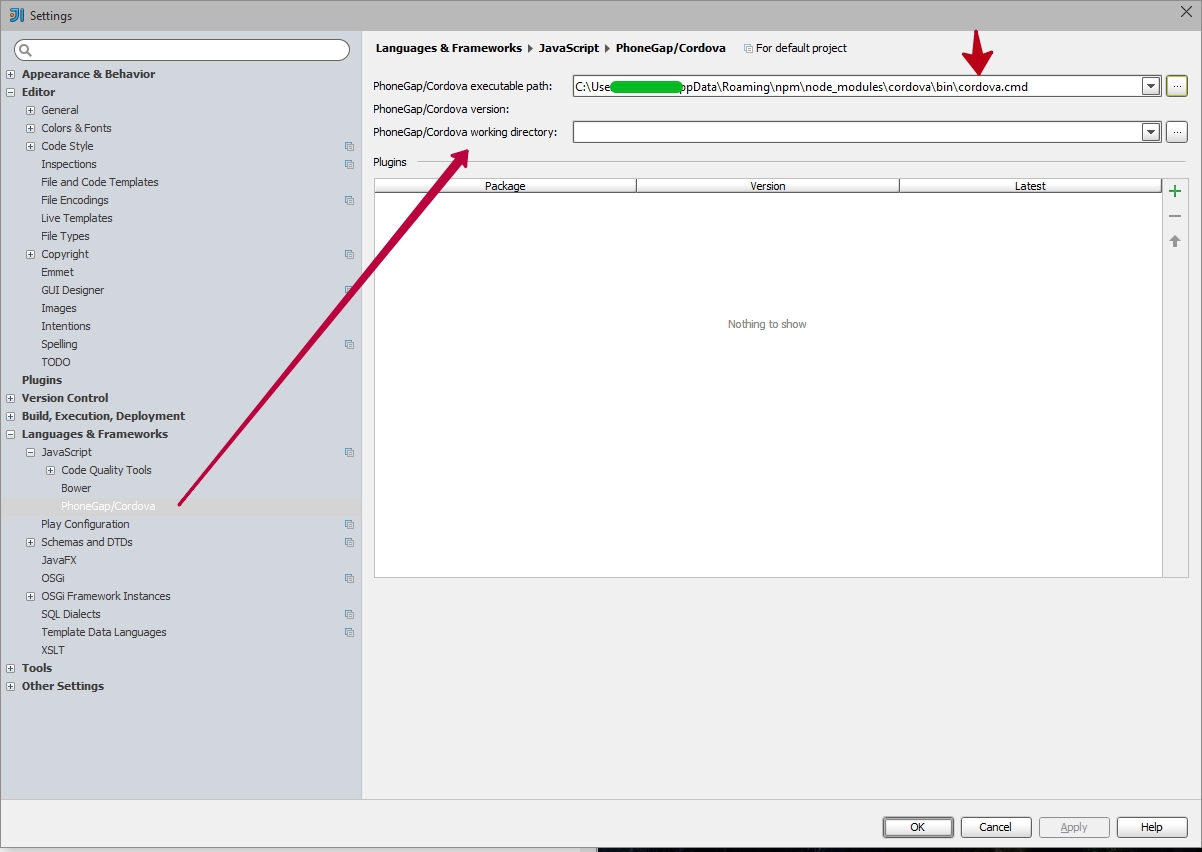
Вот теперь можно и создать новый проект:

Указываем все пути и создаём. Настраиваем компилятор:

+ этого приложение не нужно каждый раз компилировать. Достаточно выбрать:
При установленном плагине «Live Edit» ещё удобней.
Для разработки нам понадобится только 2х фала index.html — где находится наша страница (контент), index.js — основной код, который оживит приложение.
Подключаем в самом начале до тега body:
Любимая Выпадающие меню добавляем после body и всё остальное, что будем выводить:
В самом низу до закрытия тега body подключаем:
Для свайпов используем TouchSwipe-Jquery-Plugin https://github.com/mattbryson/TouchSwipe-Jquery-Plugin.
Все плагины я собираю в plugins.js.
Контент всего приложения:
index.html
Заголовок Весь код приложения:
index.js
var app = < SOME_CONSTANTS : false, initialize: function() < this.bindEvents(); this.initFastClick(); this.receivedEvent(); this.onDeviceReady(); >, bindEvents: function() < document.addEventListener('deviceready', this.onDeviceReady, false); >, initFastClick : function() < window.addEventListener('load', function() < FastClick.attach(document.body); >, false); var blockMenu = $('.block-menu_left'); $(".block-menus, input.menu-bottom").click(function () < $('.block-menu_left .menu-items').toggleClass('open-menu'); >); $('a[href^="#"], a[href^="."]',blockMenu).click( function()< var nameSlid = $(this).attr('slid'), scroll_el = $("#slider_pagination a:nth-child("+nameSlid+")"); $(scroll_el).click(); return false; >); >, onDeviceReady: function() < $(".effect-text >h1").lettering('words').children("span").lettering().children("span").lettering(); >, receivedEvent: function() < var parentElement = document.getElementById('slider'); $(parentElement).carouFredSel(< width: '100%', height: '100%', mousewheel: true, align: 'auto', items: < visible: < min: 1, max: 1 >>, prev: < button: '.nivo-nextNavSlider', easing: scroll.easing, onBefore: scroll.onBefore, onAfter : scroll.onAfter >, next: < button: '.nivo-prevNavSlider', easing: scroll.easing, onBefore: scroll.onBefore, onAfter : scroll.onAfter >, pagination:< container: "#slider_pagination", easing: scroll.easing, onBefore: scroll.onBefore, onAfter : scroll.onAfter >, scroll: < items: 1, easing: "cubic", pauseOnHover: true, onBefore: function( data ) < var objects = data.items.old; unhighlight(objects); >, onAfter : function( data ) < var objects = data.items.visible; highlight(objects); >>, auto: false, autoPlay: false, circular: false, infinite: false >, < debug:false, transition:true, wrapper:< element: "div", classname: "caroufredsel_slider" >> ); $(".slider-item",parentElement).swipe( < swipe:function(event, direction, distance, duration, fingerCount) < var nameSlid = $(this).attr('slider'), $class = nameSlid.substr(1, nameSlid.length); if (direction=='left')< nameSlid = parseInt($class, 10)+1; >if (direction=='right') < nameSlid = parseInt($class, 10)-1; >scroll_el = $("#slider_pagination a:nth-child("+nameSlid+")"); $(scroll_el).click(); > >); > >; Настройка иконки названия и подписи
config.xml
Любимая Приложение для моей девушки. Имя автора Наше приложение готово.

Из адреса компиляции видно что наш .apk файл находится по адрессу \platforms\android\ant-build\MainActivity-debug.apk.
Эффект от приложения — стоил своей работы. Она была рада и юзала его, пока не села батарейка.
Как скомпилировать приложение под различные платформы docs.phonegap.com:
cordova platform add ios cordova platform add wp7 cordova platform add wp8 cordova platform add windows8 cordova platform add amazon-fireos cordova platform add android cordova platform add blackberry10 cordova platform add firefoxos cordova build Tutorial: Create your first Android application
In this tutorial, we will create a simple yet fully-functional Android application that counts how many times you tap a droid image. After that, we will run it on an Android virtual device.
This tutorial covers a simple scenario to help you get started with Android development in IntelliJ IDEA. For comprehensive how-to guides and reference documentation, visit the Android Studio user guide.
Install the required plugins
This functionality relies on the Android and Android Design Tools plugins, which you need to install and enable.
- Press Control+Alt+S to open the IDE settings and then select Plugins .
- Open the Marketplace tab, find the Android and Android Design Tools plugins, and click Install . Restart the IDE if prompted.
Create a new Android project
Create a project
- Launch IntelliJ IDEA. On the Welcome screen, click New Project . If you already have a project open, from the main menu select File | New | Project .
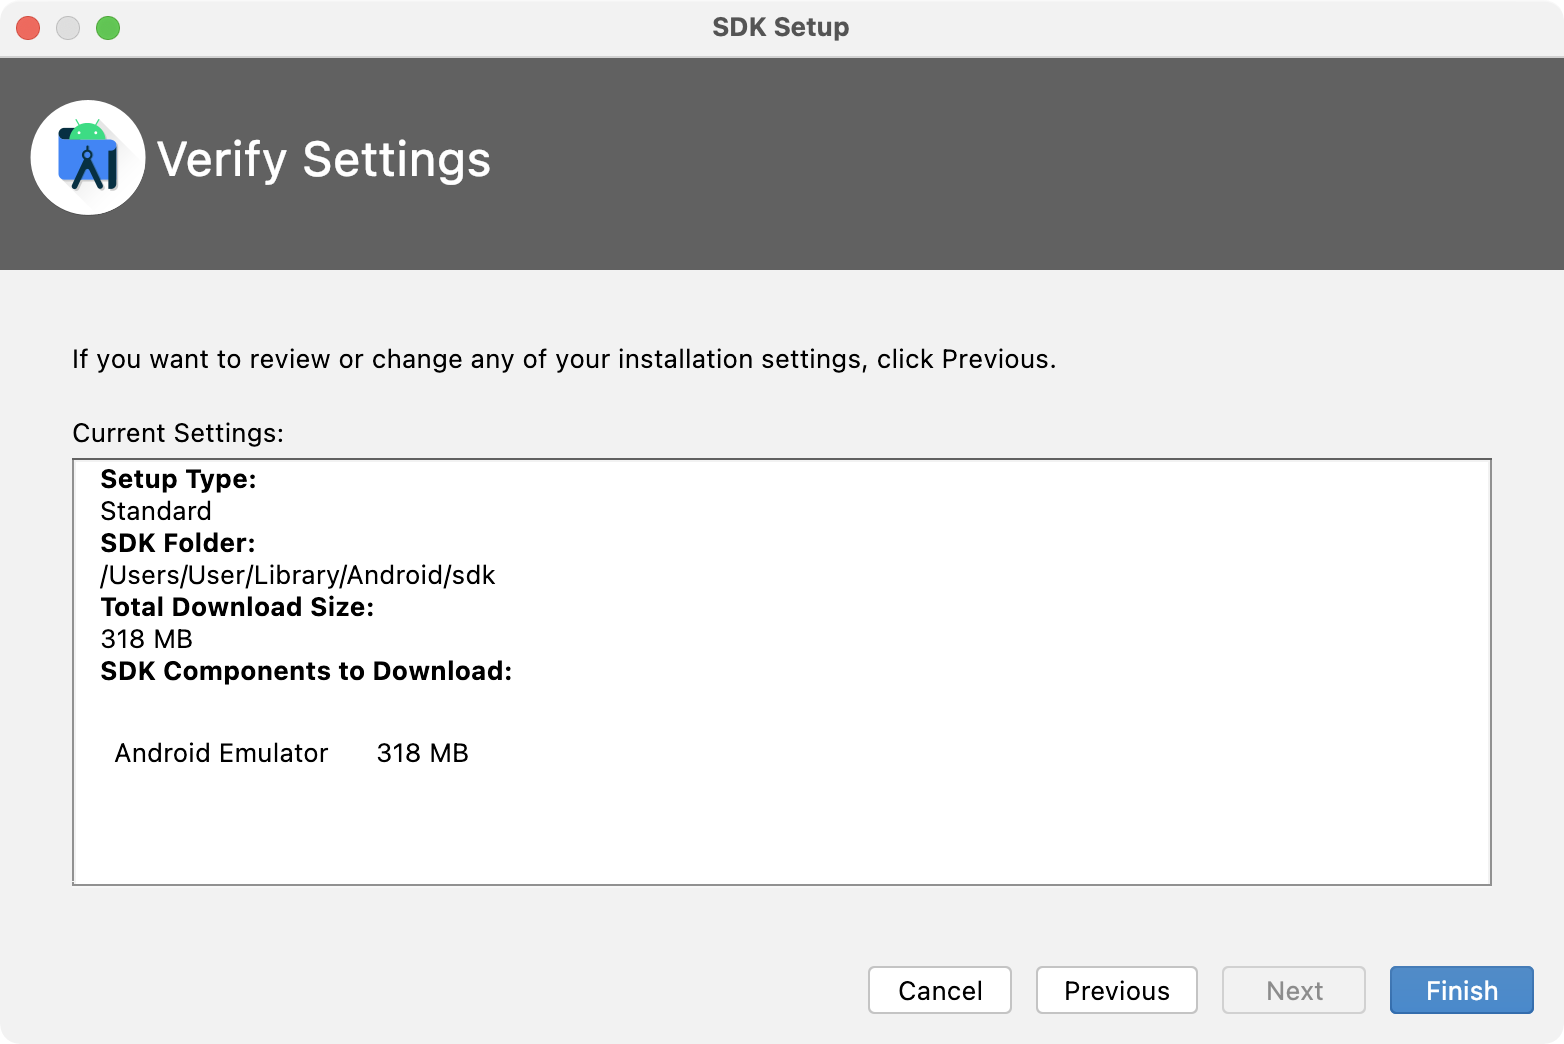
- In the New Project wizard, select Android on the left. If you don’t have the Android SDK configured, IntelliJ IDEA will detect this and prompt you to download it:

- Select the components you want to install. If you haven’t installed the Android SDK tools before, all the required components will be preselected. Optionally, modify the location for the Android SDK, and click Next :

- Review the installation settings and click Finish to start the download:
- When all components have been downloaded and installed, click Finish :

- Select Empty Activity as the project template:

- On the last step, type HelloDroid as the project name and select Java as the language:

Configure project JDK
Now that we have created our first project, let’s make sure it uses the correct JDK.
- Go to File | Project Structure and go to Platform Settings | SDKs . Select the Android SDK and make sure that the correct Java version is selected in the Java SDK field.
 We recommend that you use Java SE 11 or Java SE 8 for Android development in IntelliJ IDEA. If you don’t have the correct JDK installed, in the Project Structure dialog, click the Add New SDK button on the toolbar and select Download JDK :
- In the Settings dialog ( Control+Alt+S ), go to Build, Execution, Deployment | Build Tools | Gradle and select the correct Java version (8.x or 11.x).

Explore the project structure
For Android projects, there’s a dedicated view in the IntelliJ IDEA Project tool window: click Project in the top-left corner and select Android .

This view doesn’t reflect the actual hierarchy of files on your disk – it is organized by modules and file types to ease navigation between source files of your project. Note that it hides project files and directories that you don’t commonly use (to see them, choose the Project view):

The app folder consists of the following subfolders:
- manifests : contains the AndroidManifest.xml file, which holds general information about the application processed by the Android operating system. Among other things, it declares the package name that serves as a unique identifier for your application and the minimum version of the Android SDK required for the device where the application will run. It also declares the entry points of the application, along with permissions the application requires. For more information, refer to App Manifest Overview.
- java : contains the Java source code files grouped by packages, including JUnit tests.
- res : contains all non-code resources, such as XML layout files, UI strings, images, and so on.
The Gradle Scripts folder contains all the project’s build-related configuration files.
Edit the UI layout
At this stage, the user interface of our sample HelloDroid application is based on a simple layout defined in the activity_main.xml file located in the res/layout folder.
let’s modify the auto-generated user interface and see how the application layout is rendered without running it on any physical or virtual device.
Open the UI designer
- In the Android project view, go to the app/res/layout and double-click the activity_main.xml file to open it. Note that since IntelliJ IDEA downloads the components required to render layout files, opening it may take a few seconds. If the UI designer fails to open, and you get the Design editor is unavailable until after a successful project sync error, press Control+Shift+A , search for the Sync Project with Gradle Files action, and wait for the sync to finish. By default, IntelliJ IDEA provides a graphical view of the layout file, but you can also switch to the source code view, or view the text and the graphical representation side by side – use the icons in the top-right corner of the UI Designer pane:
 This pane shows a rectangular canvas that is synchronized with the layout definition and with the Component Tree , so any changes to the canvas are reflected there accordingly. Normally, layout files have a layout manager as their root element (for example, LinearLayout , FrameLayout , ConstraintLayout , and so on). In our example, the root element in activity_main.xml is ConstraintLayout that is responsible for positioning the elements of the application interface. For the purpose of this tutorial, we are not going to modify it, but you can learn more about designing interfaces from Build a Responsive UI with ConstraintLayout.
 - To eliminate distraction and only see how your layout is represented, click the Select Design Surface icon in the top-left corner and choose Design :

- Now let’s delete the existing text element. To do this, right-click the text label and choose Delete from the context menu.
Now the UI layout looks like the following, and we are ready to start designing the layout of our application:

Add image to the UI layout
Now let’s add a droid image to our layout.

- In the Android project view, expand the app/res folder and drag the image you want to use into the drawable folder. For this tutorial, we’ve downloaded a Hello Droid image from the Internet and saved it with the dimensions 50×50 px.
- Return to the activity_main.xml file opened in the Designer pane, from the Palette choose the ImageView element, and drag it to the canvas to the position where you want the image to appear.
- In the Pick a Resource dialog that opens, choose the resource file you’ve added and click OK :
- Next, we need to modify the default id of the imageView element to be able to reference it later. Select it in the Component Tree and in the Attributes pane on the right, enter the new identifier in the id field: droidImage . Press Enter ; in the dialog that opens, confirm that you want to update all references to the image element id:
Add text to the UI layout
Now let’s add some text to our layout.
- In the Palette pane, pick the TextView element and drag it to the canvas below the image. The widget displays some default text: TextView . To change it and link it to a string, we need to create a new text resource.
- Select the textView element in the Component Tree on the left. In the Attributes pane on the right, click the Pick a Resource icon next to the text attribute:

- In the dialog that opens, click the Add resource to the module icon in the top left corner and choose String Value .
- In the New String Value dialog, enter the resource name ( welcome_text ) and the resource value ( Hello! I’m a droid. ):

- Click OK to save the value and then click OK in the Pick a Resource dialog.
- Now let’s modify the textView element id the same way we did with imageView . Select textView in the Component Tree on the left, and in the Attributes pane set the id to a new value: clickCounter .
Add style to text
Now let’s add some style to the text to make it look more appealing.
- Pad the text a bit: locate the padding attribute, and set all values to 10dp :

- Change the font color: locate the textColor attribute, and click the Pick a Resource icon next to it. In the dialog that opens, click the Add resource to the module icon in the top left corner and choose Color Value . Enter the resource name ( text_color ) and the value ( #9C27B0 ):

- Change the font size: locate the TextSize property and click the Pick a Resource icon next to it. In the dialog that opens, click the Add resource to the module icon in the top left corner and choose Dimension Value . Enter the resource name ( text_size ) and the value ( 24sp ):

As a result, your user interface now looks like the following:

To check what your application UI looks like in landscape orientation, click the Orientation for Preview icon on the Designer toolbar and choose Landscape :

To preview what your layout looks like on different devices, select another device from the device list:

Make the application interactive
Although our sample application is fully functional at this point, it does not support any form of interaction yet. Let’s modify it to support tap events.
- In the Android project view, locate the MainActivity file under app\java\com.example.hellodroid and double-click to open it.
- MainActivity is not a very meaningful class name, so let’s rename it. Right-click this file in the Android project view and choose Refactor | Rename from the context menu or press Shift+F6 . In the dialog that opens, change the class name HelloDroidActivity and click Refactor :
 All references to this class will be updated automatically, and your application’s source code will look as follows:
- Replace the code in HelloDroid.java with the following:
Build and run the application
Now let’s build our application and run it on a virtual device.
Configure Android virtual device
First of all, to be able to run our application, we need to configure a virtual device.
- In the main IntelliJ IDEA toolbar, click the device list and choose AVD Manager :

- On the first step of the wizard, click Create Virtual Device :

- On the next step, we need to select the hardware that our virtual device will emulate. Let’s select Phone on the left, and choose Pixel 2 as the target device:

- Choose the system image you want to mimic on the virtual device, that is the OS version, the Android API level, the application binary interface (ABI), and the target SDK version:

- Click the Download link next to the system image you want to mimic on the virtual device. For this tutorial, we’ve chosen to download the R system image. In the License Agreement dialog that opens, read the license agreement and accept it, then click Next and wait for the download to finish. When the system image has been downloaded, select it and click Next in the System Image step of the wizard.
- On the last step, you can modify your virtual device name and select the startup size and orientation of the screen. Choose the portrait layout and click Finish :

- The newly configured device appears in the Android Virtual Device Manager .
Run the application
- On the main IntelliJ IDEA toolbar, make sure the automatically created Run configuration and the virtual device we’ve just configured are selected and click :
 The Android emulator will launch after the build has successfully finished, with our application started:
- Click the droid image and see how the application processes the tap events, counts them and returns the corresponding message:

For more information about running the app on a hardware device, refer to Android Studio: Run apps on a hardware device.
Создание apk-файла в Android Studio
Конечной целью любой java-разработки является создание завершенного приложения : это может быть как библиотека/исполняемый jar-файл, либо web приложение. Имеются различные типы приложений и библиотек. При всем многообразии возможных разношёрстных типов готовых библиотек и приложений android-устройства выбиваются из общей колеи. Для android-устройств конечным программным продуктом являются apk-файлы, которые можно свободно распространять между пользователями.
На заре развития программного обеспечения вся разработка для android-устройств осуществлялась, как правило, в IDE Eclipse со специализированными плагинами типа ADT (Android Development Tools). Данная среда разработки позволяет создавать для android apk-файлы. Но времена быстро меняются, и сегодня гораздо эффективнее и быстрее создавать apk-файлы в представленной ещё в 2013 году Android Studio, основанную на старом конкуренте Eclipse — системе IntelliJ IDEA.
Аббревиатура apk (Android Package Kit) символизирует формат файлов, которые используются для распространения и установки приложений на устройства android. Файл apk содержит все необходимые элементы для правильной установки приложения на устройстве, и, по своему назначению, чем-то похож на исполняемые exe-файлы в Windows. Когда Вы «заходите в магазин» Google Play, чтобы выбрать и загрузить какое-либо приложение, Ваше устройство android скачивает и устанавливает файл apk с нужным приложением.
Создание apk-файла
Рассмотрим процесс создания apk-файла на примере p13osgi, в котором использовался OSGi-фреймворк. Этот пример подробно рассмотрен на странице Android и OSGI-фреймворк Felix. В данной статье используем готовый модуль из проекта.
Заметка. Почему в качестве примера создания apk-файла выбираем данный модуль/проект, а не какой-либо другой? Дело в том, что в данном примере используется расположенная в поддиректории lib внешняя библиотека. И для нас интерес будет представлять структура apk-файла с внешней jar-библиотекой : какое место в данном пакете будет занимать внешний файл org.apache.felix.framework-6.0.3.jar. Здесь следует понимать, что OSGi-фреймворк (Felix) позволяет создавать модульную структуру приложения. Причем, в режиме run-time можно динамически подключать новые модули (bunlde), останавливать запущенные модули, одновременно подключать разноверсионные модули. Данный функционал OSGi-фреймворка на примере Вы можете реально проверить на своем компьютере; для этого необходимо познакомиться с Уроком 8.
Создание APK-файлов всех модулей проекта
Чтобы использовать самый простой способ создания apk-файла, выберите в Android Studio пункт меню «Build → Build Bundle(s)/APK(s) → APK(s)», как это представлено на следующем скриншоте.
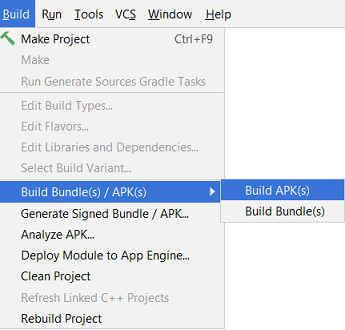
В данном случае для всех модулей проекта будут созданы apk-файлы. Здесь необходимо отметить, что apk-файлы будут без цифровой подписи и распространению не подлежат. Но на них можно «посмотреть», что мы и сделаем в последнем разделе статьи, а также можно проверить работоспособность на android-устройстве. Загрузку apk-файла на android-устройство мы рассмотрим в ближайшее время отдельной статьей. Также отдельной статьей я представлю процесс создания apk-файла с цифровой подписью при выборе пункта меню «Build → Generate Signed Bundle/APK».
А сейчас Вы должны увидеть, что для всех модулей проекта создаются apk-файлы, которые располагаются в поддиректориях проекта [project_name]/[module_name]/build/outputs/apk/debug/. Т.е. в поддиректории модуля build/outputs/apk/debug/ будет размещаться созданный apk-файл, наименование которого включает наименование модуля с постфиксом «-debug». В нашем примере будет создан файл p13osgi-debug.apk.
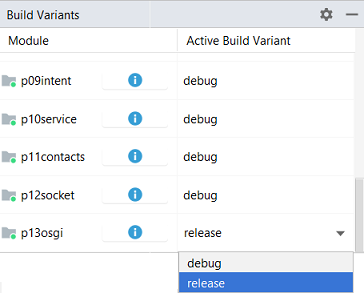
Определение типа apk : debug-release
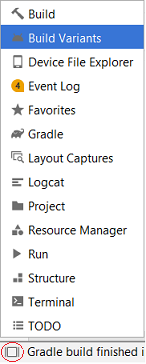
Постфикс «-debug», добавляемый к наименованию пакета, определен по умолчанию. Вы можете самостоятельно переименовать файл, и он останется работоспособным. Но можно и изменить настройки. Для этого необходимо указателем мыши нажать на расположенную в левом нижнем углу маленькую кнопочку, как это представлено на нижнем левом скриншоте. Данная кнопка открывает окно со специальными ярлыками различных вспомогательных окон. При простом наведении указателя мыши на эту кнопку, появляется список всех этих окон для быстрого выбора нужного.
Откроем окно Build Variants и в дополнительно открытом окне (скриншот справа) найдем модуль p13osgi (наш пример).
Если в выпадающем списке переключить режим сборки с debug на release, то будет создаваться пакет p13osgi-release-unsigned.apk в поддиректории «build/outputs/apk/release/».
 |
 |
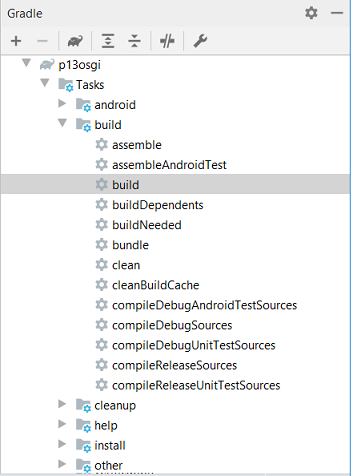
Создание APK-файла одного модуля проекта
Для того, чтобы создать apk-файл одного модуля, необходимо открыть панель Gradle (см.ярлык на скриншоте сверху слева). В открывшемся окне, как это представлено на следующем скриншоте, необходимо выбрать пункт меню «module_name → Tasks → build → build». В результате данных действий будет создан apk-файл только одного модуля.
Структура файла APK
В заключении посмотрим на внутренности нашего apk-файла. Сразу же отмечу, что apk-файл можно открыть zip-архиватором, например 7-Zip. Но многое останется недоступным. Лучше использовать анализатор apk-файлов от Android Studio. Далеко ходить не надо : необходимо выбрать пункт меню «Build → Analyze APK . » (см. самый верхний скриншот). В открывшемся диалоговом окне найти нужный пакет в файловой структуре, после чего в IDE будет открыта панель, как это представлено на следующем скриншоте.

Интерфейс панели анализатора разделен на 2 части. В верхней части Вы видите корневую структуру apk-файла. В нижней части можно просматривать структуру выделенного элемента верхней части.
Что сразу же бросается в глаза? Вспоминаем : в нашем примере/модуле была использована внешняя библиотека с OSGi-фреймворком Felix org.apache.felix.framework-6.0.3.jar, расположенная в поддиректории lib
В структуре созданного пакета поддиректория lib. Все файлы внешней jar-библиотеки размещаются в корне по пакетам. Можно предположить, что и дополнительное использование бандлов/модулей (а для чего использовать фреймворк, если не использовать бандлы) приведет к тому, что и их содержимое также будет интегрировано в общий пакет. Таким образом, мы лишаемся преимуществ использования OSGi-технологии при разработке приложений для android-устройств, поскольку любая доработка отдельного модуля/бандла будет связана с обновлением всей сборки (apk-пакета). Кроме этого, отсутствует возможность одновременного использования разноверсионных бандлов, а межмодульное взаимодействие посредством сервисов становится «слишком дорогим» (можно и напрямую постучаться к классам бандла, зачем нам посредник-активатор). На данном простом примере я не вижу преимуществ использования OSGi для создания многомодульного приложения.
Буду признателен всем, кто опровергнет данное предположение и предложит значимое использование OSGi-технологии в android-устройстве.
Что касается *.class’ов, то их также не будет в apk-файле. Им на смену пришли файлы *.dex .
Файл .dex
«Рабочей лошадкой» в системе Android является Dalvik Virtual Machine, не использующая байт-код Java. Виртуальная машина Dalvik является службой приложения, которая интерпретирует скомпилированный код в dex-файле. Инструкции байт-кода формата DEX не совпадают с инструкциями байт-кода Java. Таким образом, в apk-файле Java-классы представлены в формате .dex. Но необходимо отметить, что структура пакетов сохраняется.