Руководство. Node.js для начинающих
Если вы новичок в использовании Node.js, это руководство поможет вам начать с некоторых основ.
- Использование Node.js в Visual Studio Code
- Создание первого веб-приложения Node.js с помощью Express
- Попробуйте использовать модуль Node.js
Необходимые компоненты
- Установка Node.js в Windows или в подсистеме Windows для Linux.
Если вы впервые пробуете Node.js, рекомендуем выполнить установку непосредственно в Windows. Дополнительные сведения см. в статье Выбор между установкой Node.js в Windows и подсистеме Windows для Linux.
Использование Node.js в Visual Studio Code
Если вы еще не установили Visual Studio Code, вернитесь к предыдущему разделу предварительных требований и выполните действия по установке, связанные с Windows или WSL.
- Откройте командную строку и создайте новый каталог с помощью команды mkdir HelloNode , а затем введите каталог: cd HelloNode .
- Создайте файл JavaScript с именем «app.js» и переменной с именем «msg» в: echo var msg > app.js
- Откройте каталог и файл app.js в VS Code с помощью команды code . .
- Добавьте простую строковую переменную («Hello World»), а затем отправьте содержимое строки в консоль, введя его в файле «app.js»:
var msg = 'Hello World'; console.log(msg); Обратите внимание, что при вводе console в файл «app.js», VS Code отображает поддерживаемые параметры, связанные с объектом console , который можно выбрать из использования IntelliSense. Попробуйте поэкспериментировать с Intellisense, используя другие объекты JavaScript.
Создание первого веб-приложения Node.js с помощью Express
Express — это минимальная, гибкая и оптимизированная платформа Node.js, которая упрощает разработку веб-приложения, которое может обслуживать несколько типов запросов, таких как GET, PUT, POST и DELETE. Express поставляется с генератором приложений, который автоматически создает архитектуру файлов для приложения.
Чтобы создать проект с помощью Express.js, выполните следующие действия.
- Откройте командную строку (командная строка, Powershell или любой другой вариант).
- Создайте новую папку проекта: mkdir ExpressProjects и введите этот каталог: cd ExpressProjects
- Используйте Express для создания шаблона проекта HelloWorld: npx express-generator HelloWorld —view=pug
Примечание. Мы используем команду npx , чтобы выполнить пакет Node Express.js без фактической установки (или временно установить его в зависимости от того, как вы хотите его представить). Если вы попытаетесь использовать команду express или проверить установленную версию Express с помощью: express —version , вы получите ответ, о том, что Express не удается найти. Если вы хотите глобально установить Express, чтобы применять его на постоянной основе, используйте: npm install -g express-generator . Список пакетов, установленных npm, можно просмотреть с помощью npm list . Они будут перечислены по глубине (количество вложенных каталогов в глубину). Установленные пакеты будут иметь глубину 0. Зависимости пакета будут иметь глубину 1, дополнительные зависимости на уровне глубины — 2 и т. д. Дополнительные сведения см. в статье Различие между npx and npm на сайте StackOverflow.
- bin . Содержит исполняемый файл, который запускает приложение. Он запускает сервер (через порт 3000, если не указана альтернатива) и настраивает базовую обработку ошибок.
- public . Содержит все общедоступные файлы, включая файлы JavaScript, таблицы стилей CSS, файлы шрифтов, изображения и другие ресурсы, необходимые пользователям при подключении к веб-сайту.
- routes . Содержит все обработчики маршрутов для приложения. В этой папке автоматически создаются два файла, index.js и users.js , которые служат примерами разделения конфигурации маршрута приложения.
- views . Содержит файлы, используемые модулем шаблонов. Express настроен на поиск подходящего представления при вызове метода преобразования. Обработчик шаблонов по умолчанию — Jade, но Jade является устаревшим в сравнении с Pug, поэтому для изменения подсистемы просмотра (шаблона) мы использовали флаг —view . Параметры флага —view и другие можно увидеть, используя express —help .
- app.js . Начальная точка приложения. Она загружает все и начинает обслуживать запросы пользователей. По сути, это связующий элемент, который содержит все части вместе.
- package.json . Содержит описание проекта, диспетчер скриптов и манифест приложения. Его основное назначение заключается в отслеживании зависимостей приложения и их соответствующих версий.
npm install npx cross-env DEBUG=HelloWorld:* npm start Совет Часть DEBUG=myapp:* приведенной выше команды означает, что вы указываете Node.js включить ведение журнала в целях отладки. Не забудьте заменить «myapp» именем своего приложения. Имя приложения можно найти в файле package.json в свойстве «name». Использование npx cross-env устанавливает переменную среды DEBUG в любом терминале, но ее также можно задать с помощью конкретного терминала. Команда npm start сообщает npm о необходимости запуска скриптов в файле package.json .
Использование модуля Node.js
В Node.js есть инструменты для разработки серверных веб-приложений, некоторые из них встроены и многие другие доступны через npm. Эти модули могут помочь во множестве задач:
| Средство | Используется для |
|---|---|
| gm, sharp | Обработка изображений, включая редактирование, изменение размера, сжатие и т. д., непосредственно в коде JavaScript |
| PDFKit | Поколение PDF |
| validator.js | Проверка строки |
| imagemin, UglifyJS2 | Минификация |
| spritesmith | Создание листа спрайтов |
| winston | Ведение журналов |
| commander.js | Создание приложения командной строки |
Давайте воспользуемся встроенным модулем ОС для получения сведений об операционной системе компьютера:
- В командной строке откройте интерфейс командной строки Node.js. После входа вы увидите подсказку > , сообщающую вам, что вы используете Node.js: node
- Чтобы определить операционную систему, используемую в данный момент (которая должна возвращать ответ, сообщающий о том, что вы работаете под Windows), введите: os.platform()
- Чтобы проверить архитектуру ЦП, введите: os.arch()
- Чтобы просмотреть доступные в системе процессоры, введите: os.cpus()
- Оставьте интерфейс командной строки Node.js, введя .exit или дважды нажав CTRL+C.
Совет Модуль OS Node.js можно использовать для выполнения таких действий, как проверка платформы и возврата переменной для конкретной платформы: Win32/.bat для разработки Windows, дарвин/.sh для Mac/unix, Linux, SunOS и т. д. (например, var isWin = process.platform === «win32»; ).
Как запустить код через Node.js
Когда запускаю код, через ctrl + alt + N мне вьіводится ошибка: Node.js не является используемой командой, что то вроде того, видел похожий вопрос, у меня потому что нет руського язіка просто вьіводится Node и куча символов (сели что у меня нет папки Node.js и я не знаю как не создать)Как запустить код? Помогите пожалуйста!
Отслеживать
3,563 8 8 золотых знаков 12 12 серебряных знаков 39 39 бронзовых знаков
задан 11 дек 2022 в 10:13
7 3 3 бронзовых знака
Кавычки неправильные. Это книжные кавычки.
11 дек 2022 в 10:14
js можно и в Visual Studio пилить, там все необходимое есть из коробки
11 дек 2022 в 10:16
И мне вьіводится ошибка — что ты делаешь, чтобы начала показываться ошибка? Какая ошибка показывается, полный текст?
11 дек 2022 в 10:31
попробуйте установить node js и перезапустить vs code
11 дек 2022 в 10:32
@Grundy запускаю код через ctrl + alt + N и мне вьіводится ошибка: Node.js не является используемой командой, что то вроде того, видел похожий вопрос, у меня потому что нет руського якзьіка просто вьіводится Node и куча символов
11 дек 2022 в 12:51
1 ответ 1
Сортировка: Сброс на вариант по умолчанию
1. Скачать Node JS с официального ресурса — ссылка
2. Установить его «глобально» к себе на компьютер (как обычную программу).
Использование:
3. Открыть VSCode и нажать Ctrl + ~ (~ — где буква ё). Внизу редактора кода, откроется терминал. (Скорее всего «powershell» или «bush», в крайнем случае «cmd».
4. В поле терминала ввести команду «node -v» и нажать enter. Если терминал вернул версию Node JS (например v16.18.0) значит установлено все верно.
5. Теперь можно либо выполнять .js файлы либо писать код самому.
5.1 Писать код самому (Вводим в терминал node и enter) дальше как в обычном JavaScript, все написанное будет храниться в пределах сессии. Выйти из Node — Ctrl + C или .exit.
5.2 Выполнять .js файлы — в терминале пишем node и путь к файлу (относительно корня папки) например: node index.js
Node.js tutorial in Visual Studio Code
Node.js is a platform for building fast and scalable server applications using JavaScript. Node.js is the runtime and npm is the Package Manager for Node.js modules.
Visual Studio Code has support for the JavaScript and TypeScript languages out-of-the-box as well as Node.js debugging. However, to run a Node.js application, you will need to install the Node.js runtime on your machine.
To get started in this walkthrough, install Node.js for your platform. The Node Package Manager is included in the Node.js distribution. You’ll need to open a new terminal (command prompt) for the node and npm command-line tools to be on your PATH.
To test that you have Node.js installed correctly on your computer, open a new terminal and type node —version and you should see the current Node.js version installed.
Linux: There are specific Node.js packages available for the various flavors of Linux. See Installing Node.js via package manager to find the Node.js package and installation instructions tailored to your version of Linux.
Windows Subsystem for Linux: If you are on Windows, WSL is a great way to do Node.js development. You can run Linux distributions on Windows and install Node.js into the Linux environment. When coupled with the WSL extension, you get full VS Code editing and debugging support while running in the context of WSL. To learn more, go to Developing in WSL or try the Working in WSL tutorial.
Hello World
Let’s get started by creating the simplest Node.js application, «Hello World».
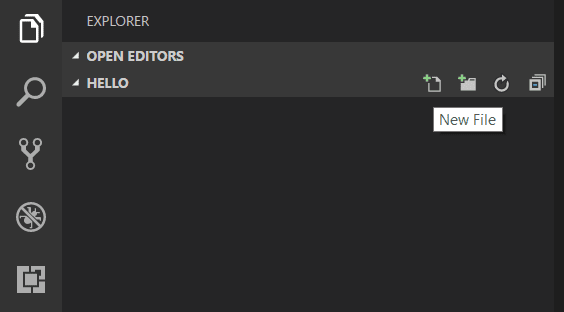
Create an empty folder called «hello», navigate into and open VS Code:
mkdir hello cd hello code . Tip: You can open files or folders directly from the command line. The period ‘.’ refers to the current folder, therefore VS Code will start and open the Hello folder.
From the File Explorer toolbar, press the New File button:
and name the file app.js :
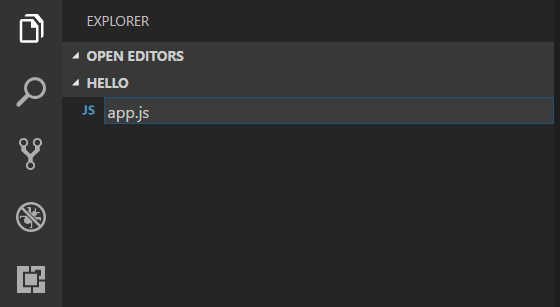
By using the .js file extension, VS Code interprets this file as JavaScript and will evaluate the contents with the JavaScript language service. Refer to the VS Code JavaScript language topic to learn more about JavaScript support.
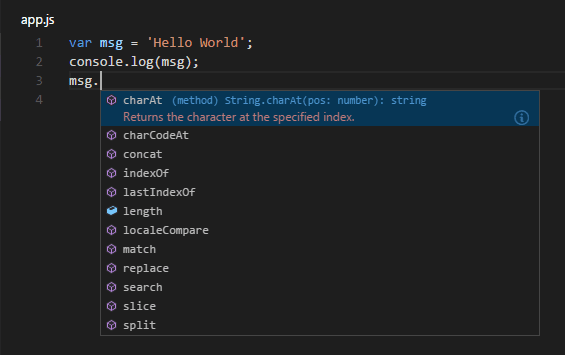
Create a simple string variable in app.js and send the contents of the string to the console:
var msg = 'Hello World'; console.log(msg); Note that when you typed console. IntelliSense on the console object was automatically presented to you.
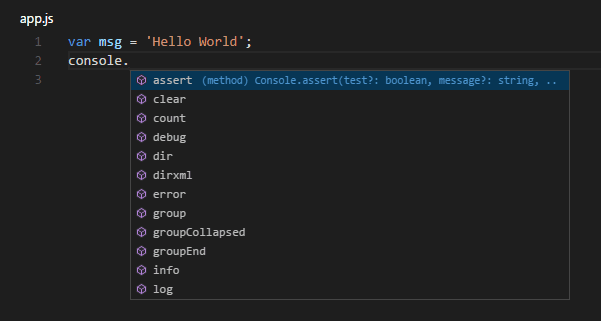
Also notice that VS Code knows that msg is a string based on the initialization to ‘Hello World’ . If you type msg. you’ll see IntelliSense showing all of the string functions available on msg .
After experimenting with IntelliSense, revert any extra changes from the source code example above and save the file ( ⌘S (Windows, Linux Ctrl+S ) ).
Running Hello World
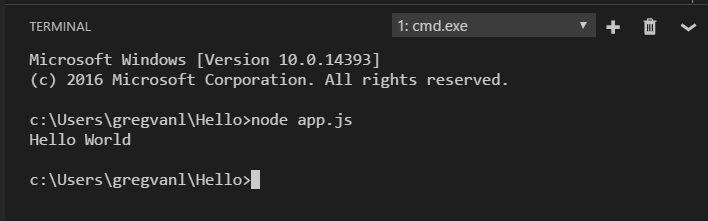
It’s simple to run app.js with Node.js. From a terminal, just type:
node app.js You should see «Hello World» output to the terminal and then Node.js returns.
Integrated Terminal
VS Code has an integrated terminal which you can use to run shell commands. You can run Node.js directly from there and avoid switching out of VS Code while running command-line tools.
View > Terminal ( ⌃` (Windows, Linux Ctrl+` ) with the backtick character) will open the integrated terminal and you can run node app.js there:
For this walkthrough, you can use either an external terminal or the VS Code integrated terminal for running the command-line tools.
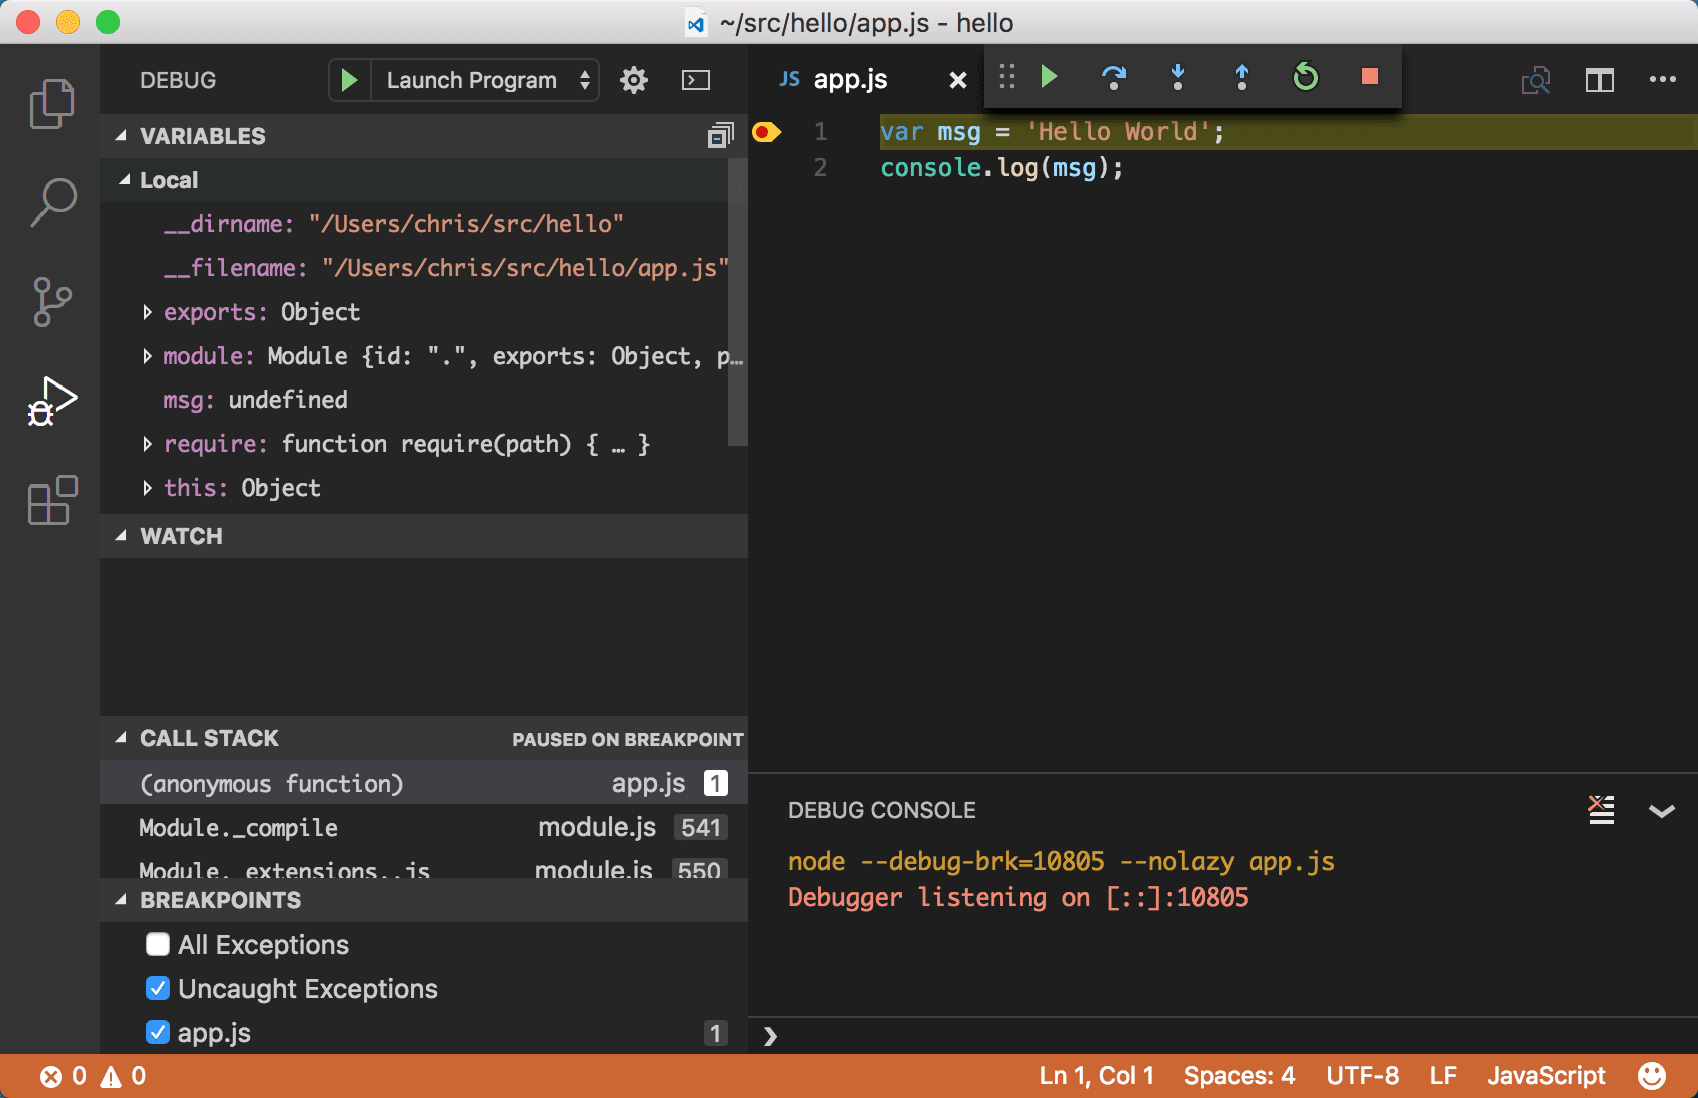
Debugging Hello World
As mentioned in the introduction, VS Code ships with a debugger for Node.js applications. Let’s try debugging our simple Hello World application.
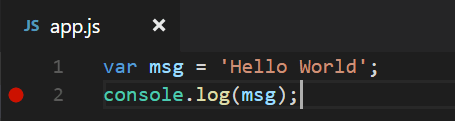
To set a breakpoint in app.js , put the editor cursor on the first line and press F9 or click in the editor left gutter next to the line numbers. A red circle will appear in the gutter.
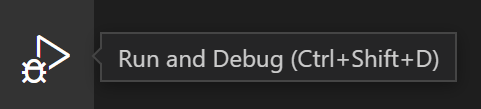
To start debugging, select the Run and Debug view in the Activity Bar:
You can now click Debug toolbar green arrow or press F5 to launch and debug «Hello World». Your breakpoint will be hit and you can view and step through the simple application. Notice that VS Code displays a different colored Status Bar to indicate it is in Debug mode and the DEBUG CONSOLE is displayed.
Now that you’ve seen VS Code in action with «Hello World», the next section shows using VS Code with a full-stack Node.js web app.
Note: We’re done with the «Hello World» example so navigate out of that folder before you create an Express app. You can delete the «Hello» folder if you want as it is not required for the rest of the walkthrough.
An Express application
Express is a very popular application framework for building and running Node.js applications. You can scaffold (create) a new Express application using the Express Generator tool. The Express Generator is shipped as an npm module and installed by using the npm command-line tool npm .
Tip: To test that you’ve got npm correctly installed on your computer, type npm —help from a terminal and you should see the usage documentation.
Install the Express Generator by running the following from a terminal:
npm install -g express-generator The -g switch installs the Express Generator globally on your machine so you can run it from anywhere.
We can now scaffold a new Express application called myExpressApp by running:
express myExpressApp --view pug This creates a new folder called myExpressApp with the contents of your application. The —view pug parameters tell the generator to use the pug template engine.
To install all of the application’s dependencies (again shipped as npm modules), go to the new folder and execute npm install :
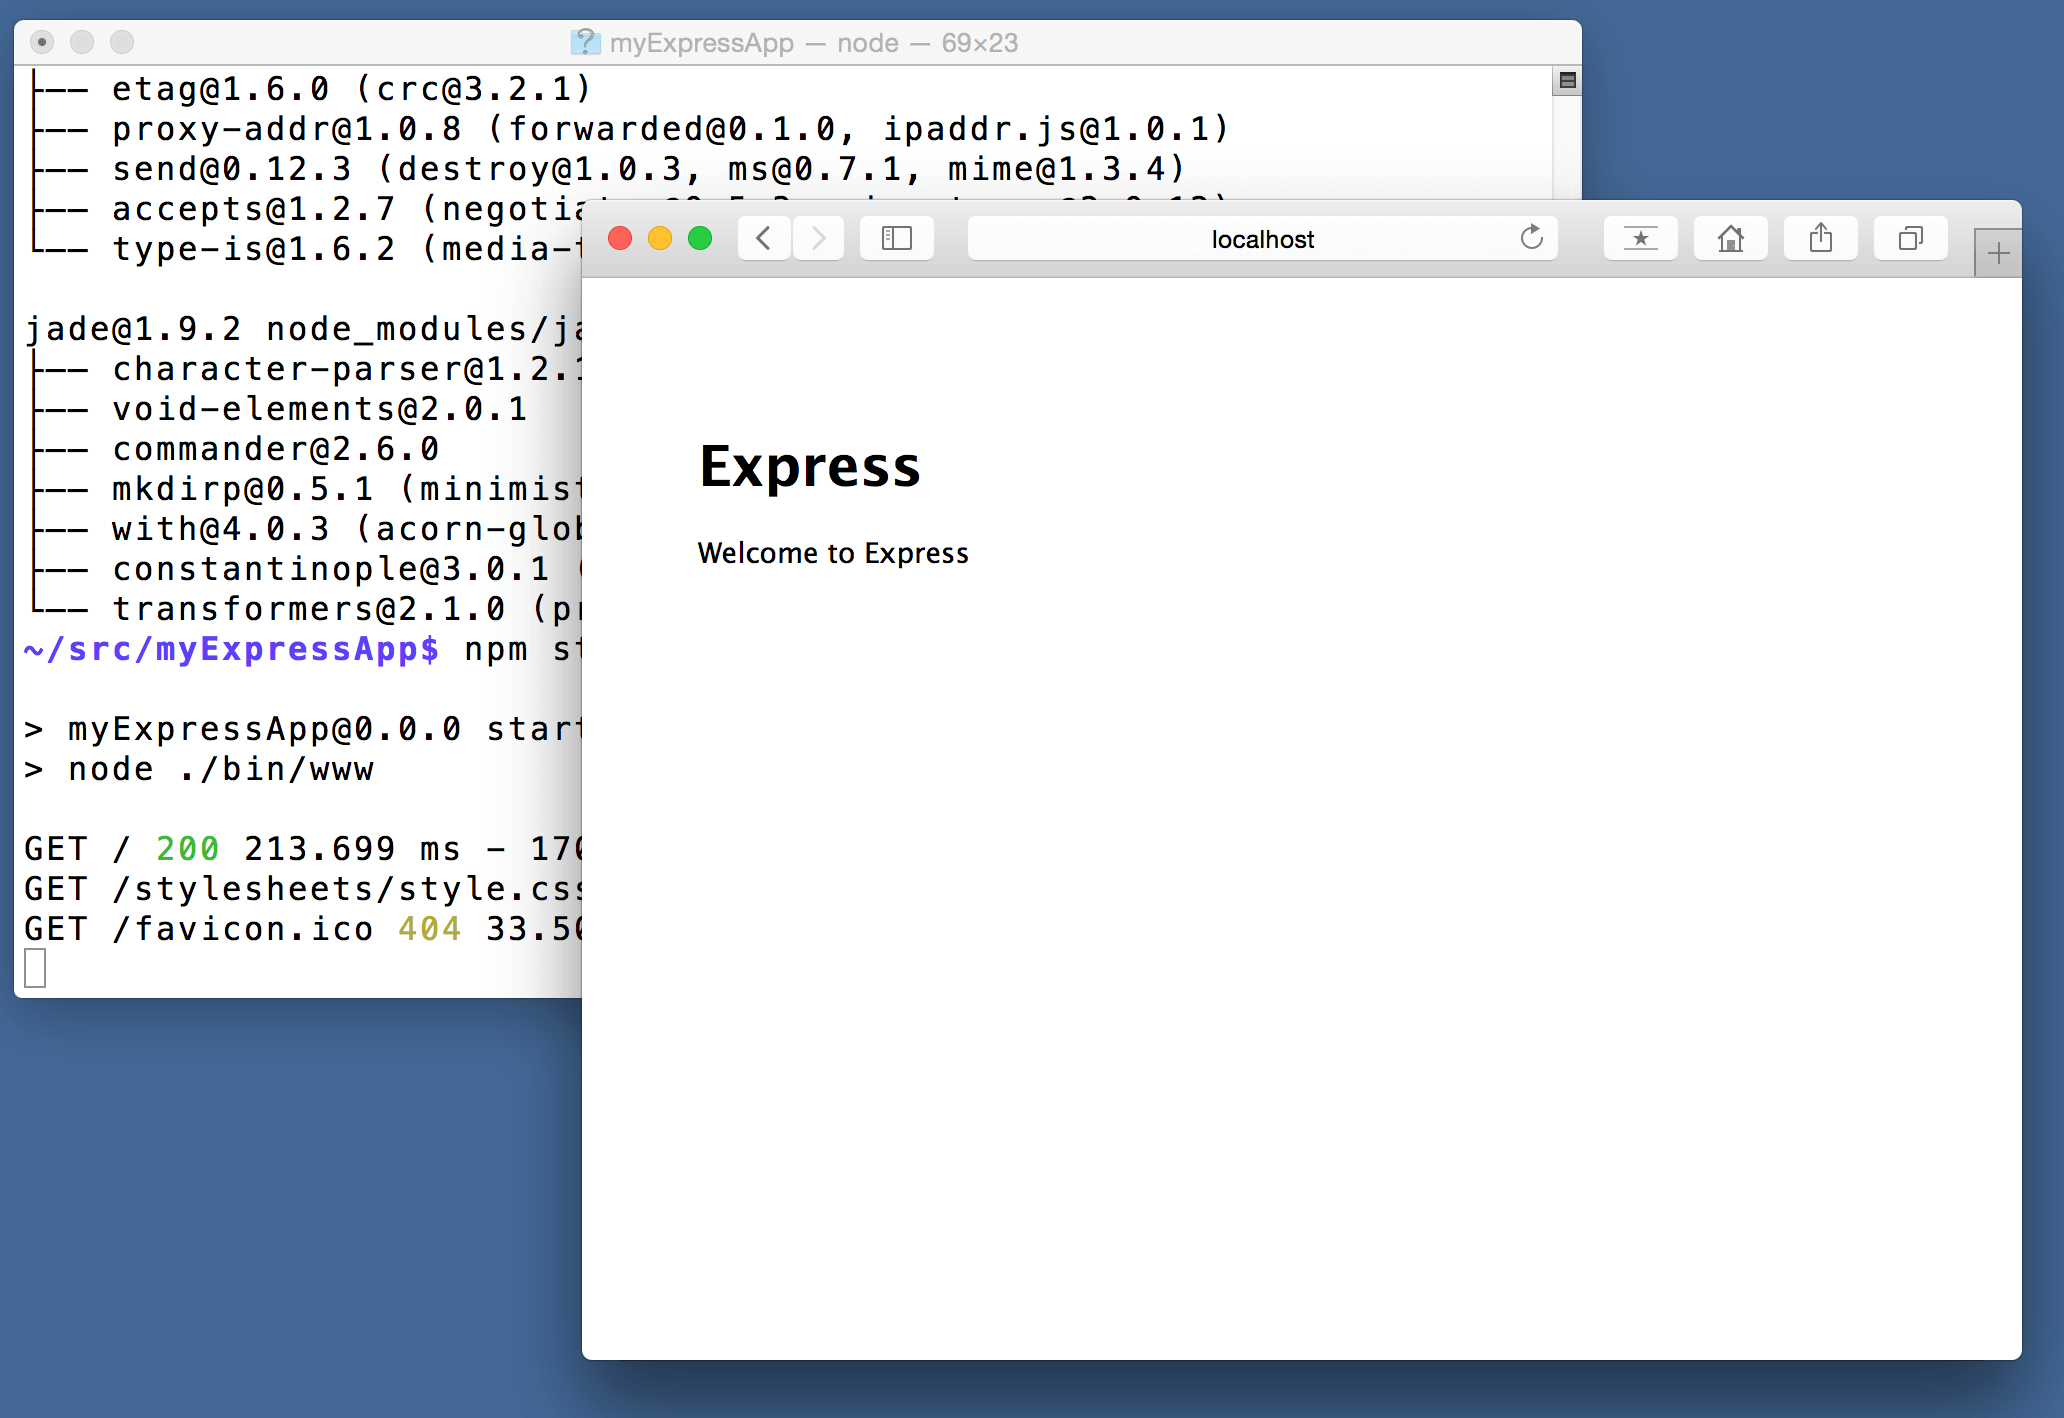
cd myExpressApp npm install At this point, we should test that our application runs. The generated Express application has a package.json file which includes a start script to run node ./bin/www . This will start the Node.js application running.
From a terminal in the Express application folder, run:
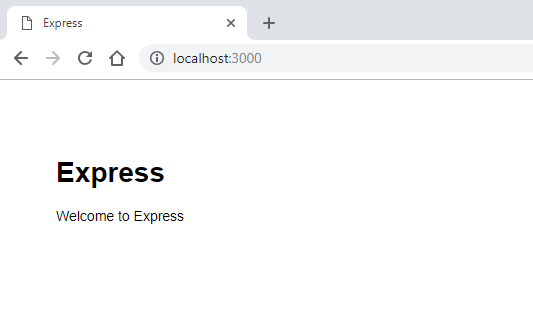
npm start The Node.js web server will start and you can browse to http://localhost:3000 to see the running application.
Great code editing
Close the browser and from a terminal in the myExpressApp folder, stop the Node.js server by pressing CTRL+C .
Now launch VS Code:
code . Note: If you’ve been using the VS Code integrated terminal to install the Express generator and scaffold the app, you can open the myExpressApp folder from your running VS Code instance with the File > Open Folder command.
The Node.js and Express documentation does a great job explaining how to build rich applications using the platform and framework. Visual Studio Code will make you more productive in developing these types of applications by providing great code editing and navigation experiences.
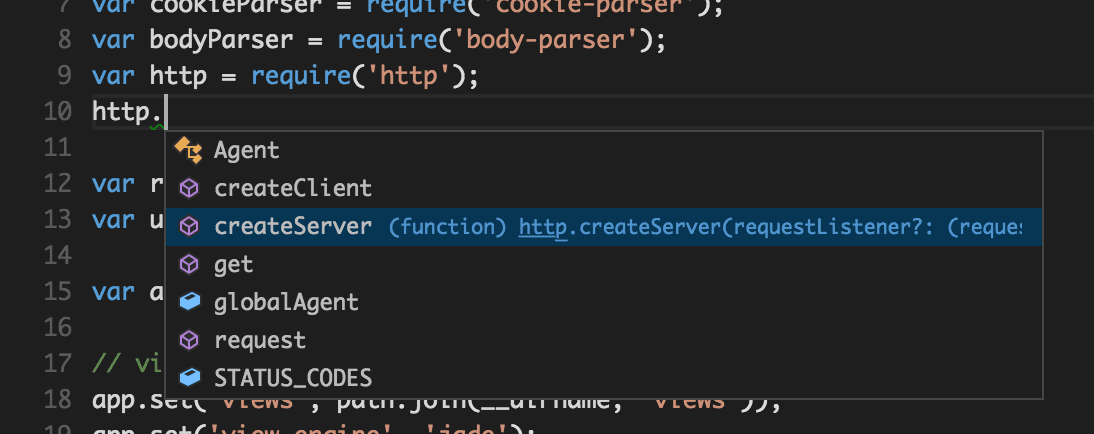
Open the file app.js and hover over the Node.js global object __dirname . Notice how VS Code understands that __dirname is a string. Even more interesting, you can get full IntelliSense against the Node.js framework. For example, you can require http and get full IntelliSense against the http class as you type in Visual Studio Code.
VS Code uses TypeScript type declaration (typings) files (for example node.d.ts ) to provide metadata to VS Code about the JavaScript based frameworks you are consuming in your application. Type declaration files are written in TypeScript so they can express the data types of parameters and functions, allowing VS Code to provide a rich IntelliSense experience. Thanks to a feature called Automatic Type Acquisition , you do not have to worry about downloading these type declaration files, VS Code will install them automatically for you.
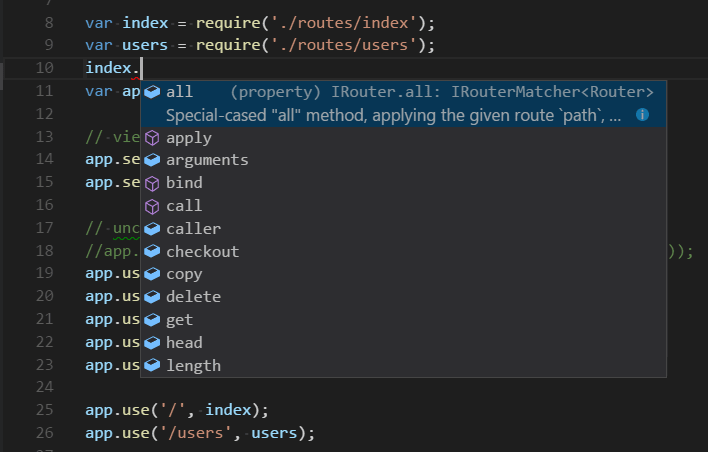
You can also write code that references modules in other files. For example, in app.js we require the ./routes/index module, which exports an Express.Router class. If you bring up IntelliSense on index , you can see the shape of the Router class.
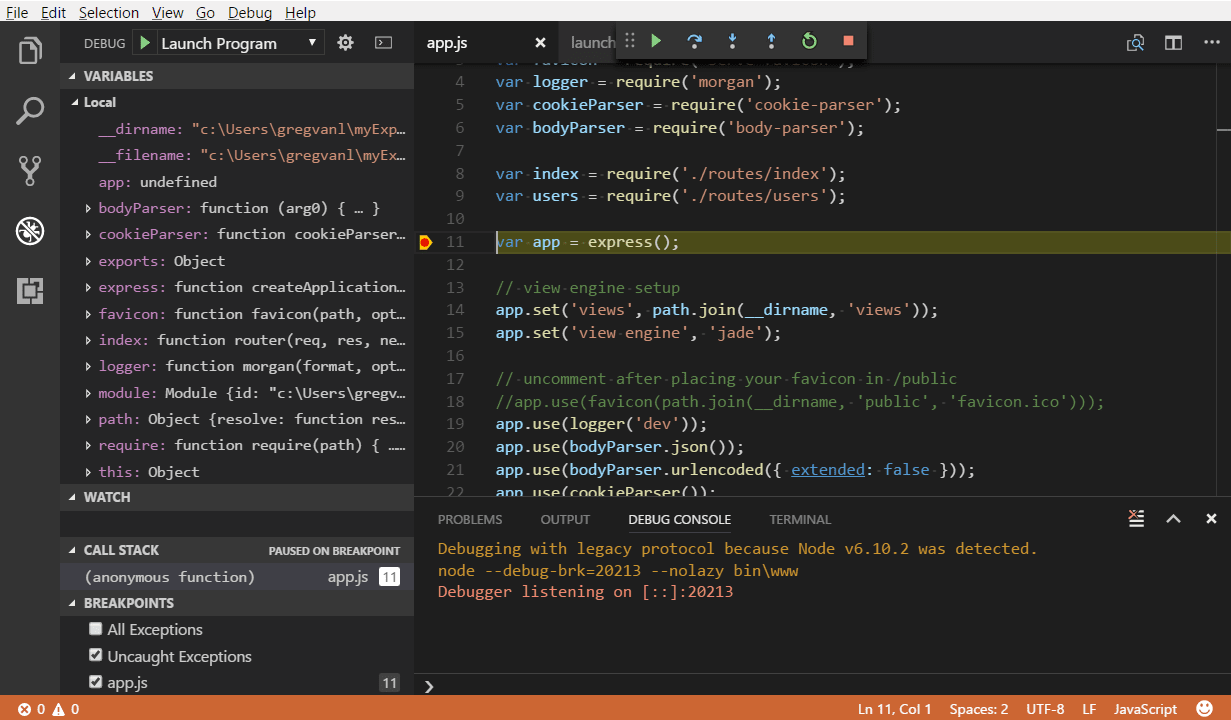
Debug your Express app
You will need to create a debugger configuration file launch.json for your Express application. Click on Run and Debug in the Activity Bar ( ⇧⌘D (Windows, Linux Ctrl+Shift+D ) ) and then select the create a launch.json file link to create a default launch.json file. Select the Node.js environment by ensuring that the type property in configurations is set to «node» . When the file is first created, VS Code will look in package.json for a start script and will use that value as the program (which in this case is «$\\bin\\www ) for the Launch Program configuration.
"version": "0.2.0", "configurations": [ "type": "node", "request": "launch", "name": "Launch Program", "program": "$ \\bin\\www" > ] > Save the new file and make sure Launch Program is selected in the configuration dropdown at the top of the Run and Debug view. Open app.js and set a breakpoint near the top of the file where the Express app object is created by clicking in the gutter to the left of the line number. Press F5 to start debugging the application. VS Code will start the server in a new terminal and hit the breakpoint we set. From there you can inspect variables, create watches, and step through your code.
Deploy your application
If you’d like to learn how to deploy your web application, check out the Deploying Applications to Azure tutorials where we show how to run your website in Azure.
Next steps
There is much more to explore with Visual Studio Code, please try the following topics:
- Node.js profile template — Create a new profile with a curated set of extensions, settings, and snippets.
- Settings — Learn how to customize VS Code for how you like to work.
- Debugging — This is where VS Code really shines.
- Video: Getting started with Node.js debugging — Learn how to attach to a running Node.js process.
- Node.js debugging — Learn more about VS Code’s built-in Node.js debugging.
- Debugging recipes — Examples for scenarios like client-side and container debugging.
- Tasks — Running tasks with Gulp, Grunt and Jake. Showing Errors and Warnings.
Как установить node js в vscode

Как запустить код JavaScript в Visual Studio Code
03 марта 2023
Оценки статьи
Еще никто не оценил статью
Иногда возникает необходимость запустить фрагмент кода JavaScript напрямую в Visual Studio Code (VSCode), чтобы проверить его работоспособность. В этой статье мы рассмотрим, как запустить код JavaScript в VS Code.
Установка Node.js на компьютер
Первым шагом для запуска JavaScript в VS Code является установка Node.js.
Node.js — это среда выполнения JavaScript, которая позволяет запускать JavaScript на стороне сервера.
Она включает в себя средства для выполнения JavaScript кода в командной строке, которые можно использовать для тестирования и отладки JavaScript кода.
Вы можете загрузить и установить Node.js с официального сайта по ссылке
Создайте файл JavaScript в VS Code
После установки Node.js вы можете создать файл JavaScript в VS Code.
Чтобы создать новый файл JavaScript, выберите File -> New File в меню VS Code. Затем сохраните файл с расширением .js (например, index.js).
Напишите JavaScript код
После создания файла JavaScript вы можете написать код, который хотите запустить. Например, давайте создадим новый массива на основе существующего массива с помощью map() :
let numbers = [1, 2, 3, 4, 5]; let squares = numbers.map(num => num ** 2); console.log(squares); Запустите код
Теперь мы готовы запустить наш JavaScript код. Чтобы запустить код, выберите Terminal -> New Terminal в меню VS Code, чтобы открыть новую вкладку терминала. В терминале введите следующую команду: node index.js
где index.js — это имя файла, который вы создали ранее.
После выполнения этой команды вы увидите вывод в консоли:
>>> [ 1, 4, 9, 16, 25 ] 
Это означает, что ваш JavaScript код успешно запущен в VS Code!
Вы можете также использовать VS Code для отладки JavaScript кода, используя встроенные средства отладки. Для этого вам нужно создать конфигурационный файл отладки (launch.json) и настроить его для запуска и отладки вашего JavaScript кода.
В заключение, запуск JavaScript кода в VS Code — это очень простой процесс, который можно выполнить всего за несколько шагов.
Установите Node.js, создайте файл JavaScript, напишите код и запустите его в терминале VS Code. Вы можете использовать этот процесс для разработки и отладки JavaScript приложений в VS Code.