Scratch files
Sometimes you may need to create temporary notes or draft up some code outside the project context. Instead of switching to a different application, you can use scratch files and scratch buffers .
Scratch files and buffers are not related to a specific project. They are available for any project that you open with the specific IDE instance.
- Scratch files are fully functional, runnable, and debuggable files that support syntax highlighting, code completion, and all other features for the corresponding file type. For example, while working on one project, you may come up with an idea for a method that you could later use in another project. You can create a scratch file with a draft of the method, which is not stored in your project directory but can be opened when you’re working on any other project. You can use scratch files to draft code constructs, HTTP requests, JSON documents, and so on.
- Scratch buffers are simple text files without any coding assistance features. Scratch buffers can be used for simple task lists and notes to yourself. They are also not stored in the project directory and can be opened from any other project. You can create up to five scratch buffers with default names, which are rotated and reused by clearing the content.
Scratch files and buffers are stored in the IDE configuration directory under scratches .
Create a scratch file
- Go to File | New | Scratch File or press Control+Alt+Shift+Insert . Alternatively, in the Project tool window , right-click any area and navigate to New | Scratch File .
- Select the language of the scratch file. Scratch files of the same type are automatically numbered and added to the Scratches and Consoles directory of the Project view.
Alternatively, you can create a new scratch file with the contents of the current selection in the editor. Select some text or code, press Alt+Enter and then select Create new scratch file from selection . WebStorm will attempt to detect the language of the selected fragment and use the appropriate type and extension. If it can’t detect the language of the selection, WebStorm will create the file with the same type and extension as the original file.
WebStorm numbers scratch files sequentially starting from 1. If you close a tab with an empty scratch file, WebStorm deletes it.
Create a scratch buffer
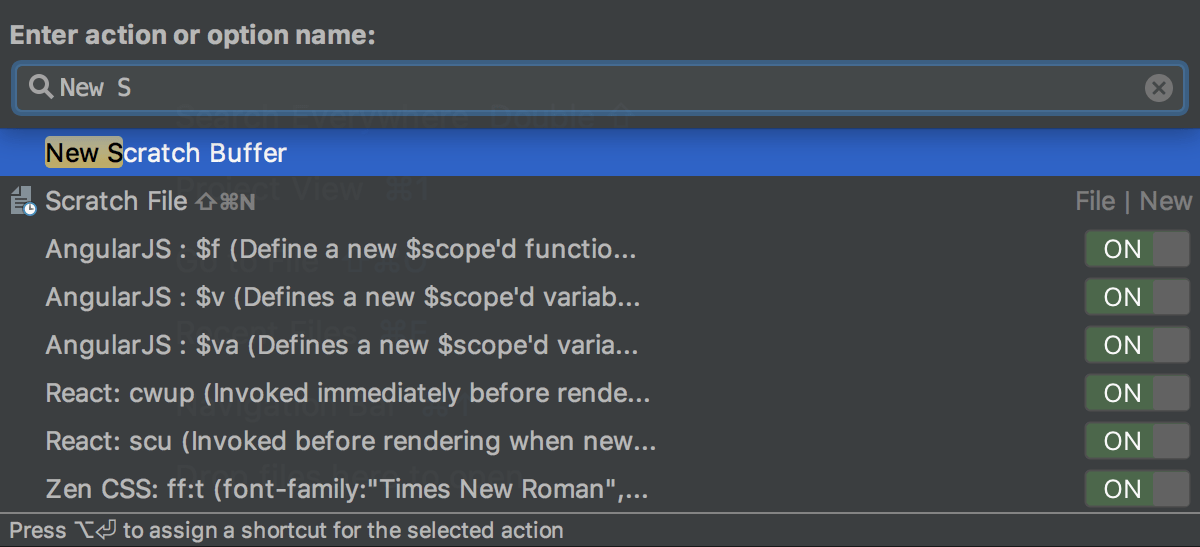
- There is no dedicated menu item for the action to create a new scratch buffer, but you can use the Find Action popup Control+Shift+A and run the New Scratch Buffer action.
View available scratches
- To see the list of created scratch files and buffers, open the Project tool window and select Scratches and Consoles | Scratches :

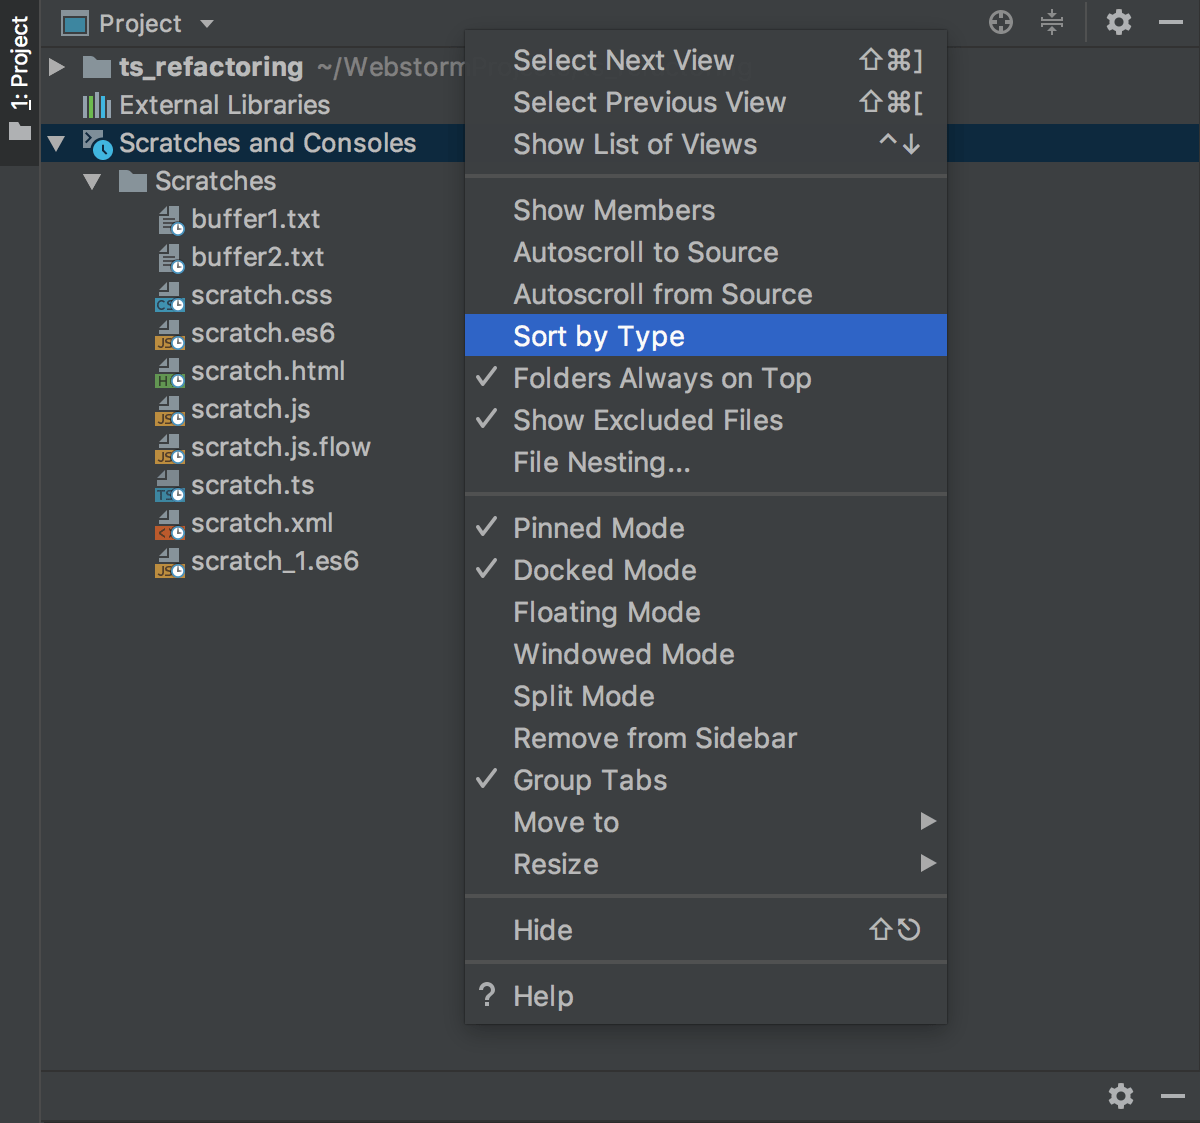
- By default, scratch files and buffers are sorted alphabetically by their names and next by their extensions (types), which automatically means that buffer files always come first. To sort scratch files by types, click or right-click the Project tab and select Sort by Type :
 WebStorm sorts scratches alphabetically based on their extensions :
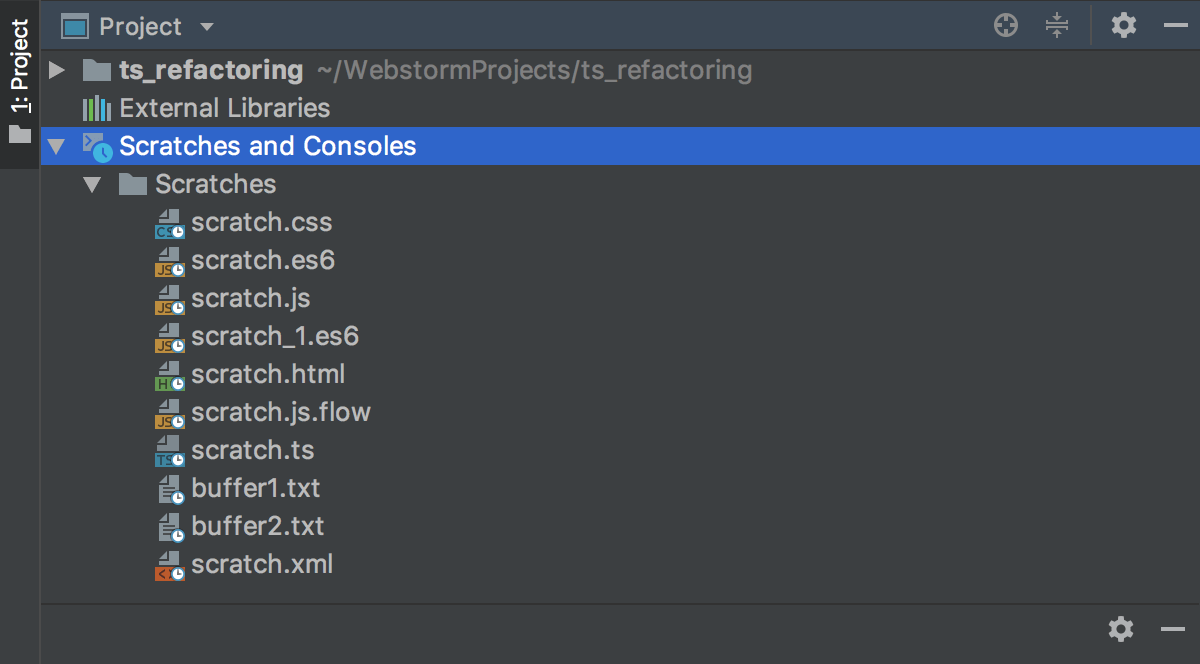
Rename scratches
- In the Project tool window, click Scratches under Scratches and Consoles , select the file to rename, and press Shift+F6 .
- In the dialog that opens, type the new name. Note that specifying another extension does not affect the file type, use the Change Language action for that.
For more information, refer to Renaming files and folders.
Copy scratches
- In the Project tool window, in the Scratches and Consoles | Scratches directory, select the scratch file to copy.
- Press F5 . In the dialog that opens, type the new filename. Here you can also specify another extension to change the file type. If necessary, select the folder where you want to save the copy.
For more information, refer to Copying files and folders.
Change the language of scratches
- In the Project tool window, click Scratches under Scratches and Consoles , and choose Change Language () from the context menu of the scratch file to change the language for.
- Select the desired language. Note the following:
- Four last used items are on top of the list, above the separator.
- To narrow down the list, start typing the language name.
- The Change Language action keeps extension in sync, if it exists.
You can assign a shortcut to the Change Language action as described in Configuring keyboard shortcuts.
Run and debug scratches
- Install the required packages and add the corresponding import statements to the scratch file. For example, to use JQuery:
- Open package.json and add the following packages to the dependencies property:
«dependencies»: < "jquery": "^3.5.0", "jsdom": "^16.2.2", "core-js": "^3.6.5", "nuxt": "^2.14.5" >
const= require(«jsdom»); const = new JSDOM(«»); const $ = require(‘jquery’)(window); Include a scratch file into your project
If a scratch file grows into something that you want to use in your project, move it into the desired directory of your project structure.
- Open a scratch file in the editor or select it under the Scratches and Consoles | Scratches directory in the Project view, press F6 , and select the target directory in your project. For more information, refer to Moving files and folders.
- Drag a scratch file from the Scratches and Consoles | Scratches directory in the Project view to the target directory in your project.
- Select a scratch file in the Scratches and Consoles | Scratches directory in the Project view and press Control+X , then select the target directory in your project and press Control+V .
View documentation for scratches
- Select any scratch file or buffer in the Project tool window and press Control+Q to view quick documentation with the location, type, size, creation and modification date of the file.
Scratch files
Sometimes you may need to create temporary notes or draft up some code outside the project context. Instead of switching to a different application, you can use scratch files and scratch buffers .
Scratch files and buffers are not related to a specific project. They are available for any project that you open with the specific IDE instance.
- Scratch files are fully functional files that support syntax highlighting, code completion, and all other features for the corresponding file type. For example, while working on one project, you may come up with an idea for a method that you could later use in another project. You can create a scratch file with a draft of the method, which is not stored in your project directory but can be opened when you’re working on any other project. You can use scratch files to draft code constructs, HTTP requests, JSON documents, and so on.
- Scratch buffers are simple text files without any coding assistance features. Scratch buffers can be used for simple task lists and notes to yourself. They are also not stored in the project directory and can be opened from any other project. You can create up to five scratch buffers with default names, which are rotated and reused by clearing the content.
By default, existing scratch files and buffers are shown in the Scratches and Consoles node in the Solution Explorer tool window . If you don’t use scratches, you can hide this node: click the Options button () on the title bar and then clear the checkbox next to Scratches and Consoles

Create a scratch file
- Go to File | New | Scratch File or press Control+Alt+Shift+Insert . Alternatively, in the Solution Explorer tool window , right-click any area and navigate to New | Scratch File .
- Select the language of the scratch file. Scratch files of the same type are automatically numbered and added to the Scratches and Consoles directory of the Solution Explorer.
Alternatively, you can create a new scratch file with the contents of the current selection in the editor. Select some text or code, press Alt+Enter and then select Create new scratch file from selection . JetBrains Rider will attempt to detect the language of the selected fragment and use the appropriate type and extension. If it can’t detect the language of the selection, JetBrains Rider will create the file with the same type and extension as the original file.
If you close a tab with an empty scratch file, JetBrains Rider deletes it.
You can run a C# scratch file or any of its parts using C# Interactive.
Run a C# scratch file
- Select the desired part of the code in the scratch file. You can successively extend selection with Control+W or select the whole file contents with Control+A .
- Press Alt+Enter .
- Choose Send Selection to C# Interactive in the action list.
- JetBrains Rider will start a new interactive session in a new tab of the Run window and send the selected code to this session. If a C# interactive session is already running, the selected code will be appended to this session.
Create a scratch buffer
- There is no dedicated menu item for the action to create a new scratch buffer, but you can use the Find Action popup Control+Shift+A and run the New Scratch Buffer action.
You can also add a shortcut for the New Scratch Buffer action as described in Customize keyboard shortcuts.
JetBrains Rider creates a text file named buffer1.txt .
The next scratch buffer you create is named buffer2.txt , and so on up to buffer5.txt . When JetBrains Rider reaches that limit, it will recreate buffer1.txt and suggest clearing the content for it. If you want to make sure JetBrains Rider does not clear the scratch buffer after you have five, you can rename it.
View all scratch files and buffers

- Open the Solution Explorer and expand Scratches and Consoles | Scratches .
- Use the Find Action popup Control+Shift+A to invoke the Show Scratch Files action and view all available scratch files in a popup:
Location of scratch files and buffers
By default, JetBrains Rider stores scratch files and buffers in the IDE configuration directory under scratches . They are available from any IDE and project that uses this configuration directory.
Scratch files
Sometimes you may need to create temporary notes or draft up some code outside the project context. Instead of switching to a different application, you can use scratch files and scratch buffers .
Scratch files and buffers are not related to a specific project. They are available for any project that you open with the specific IDE instance.
- Scratch files are fully functional, runnable, and debuggable files that support syntax highlighting, code completion, and all other features for the corresponding file type. For example, while working on one project, you may come up with an idea for a method that you could later use in another project. You can create a scratch file with a draft of the method, which is not stored in your project directory but can be opened when you’re working on any other project. You can use scratch files to draft code constructs, HTTP requests, JSON documents, and so on.
- Scratch buffers are simple text files without any coding assistance features. Scratch buffers can be used for simple task lists and notes to yourself. They are also not stored in the project directory and can be opened from any other project. You can create up to five scratch buffers with default names, which are rotated and reused by clearing the content.
Create a scratch file
- Go to File | New | Scratch File or press Control+Alt+Shift+Insert . Alternatively, in the Project tool window , right-click any area and navigate to New | Scratch File .
- Select the language of the scratch file. Scratch files of the same type are automatically numbered and added to the Scratches and Consoles directory of the Project view.
Alternatively, you can create a new scratch file with the contents of the current selection in the editor. Select some text or code, press Alt+Enter and then select Create new scratch file from selection . PyCharm will attempt to detect the language of the selected fragment and use the appropriate type and extension. If it can’t detect the language of the selection, PyCharm will create the file with the same type and extension as the original file.
PyCharm numbers scratch files sequentially starting from 1. If you close a tab with an empty scratch file, PyCharm deletes it.
Create a scratch buffer

- There is no dedicated menu item for the action to create a new scratch buffer, but you can use the Find Action popup Control+Shift+A and run the New Scratch Buffer action.
You can also add a shortcut for the New Scratch Buffer action as described in Configure keyboard shortcuts.
PyCharm creates a text file named buffer1.txt .
The next scratch buffer you create is named buffer2.txt , and so on up to buffer5.txt . When PyCharm reaches that limit, it will recreate buffer1.txt and suggest clearing the content for it. If you want to make sure PyCharm does not clear the scratch buffer after you have five, you can rename it.
View all scratch files and buffers
- Open the Project view and expand Scratches and Consoles | Scratches .
 Consoles are used to compose and execute SQL statements for databases defined in PyCharm as data sources. This functionality is available only when the Database Tools and SQL plugin is enabled. For more information, refer to Query consoles.
 - Use the Find Action popup Control+Shift+A to invoke the Show Scratch Files action and view all available scratch files in a popup:

Location of scratch files and buffers
By default, PyCharm stores scratch files and buffers in the IDE configuration directory under scratches . They are available from any IDE and project that uses this configuration directory.
Scratch файлы в IDE JetBrains

Scratch-файлы — это временные файлы для экспериментов или прототипирования в редакторе без создания файлов внутри проекта.
Ctrl + Alt + Shift + Insert — открыть панель выбора шаблона/языка для создания скретч-файла.
Scratch-файл храниться до его закрытия.
Создается и открывается редакторе временный файл в каталоге:
ls -la ~/.config/JetBrains/PhpStorm2022.1/scratches/Вы можете открыть scratch-каталог во встроенном терминале: Ctrl + Shift + A » Open in Terminal.
И запустить выполнение файла. Или запустить встроенный в PHP веб-сервер:
php -S --port 8001#ide #phpstorm #scratch files
