Path variables
Use path variables to define absolute paths to resources that are not part of a specific project. These external resources may be located in different places on the computers of your teammates. This is why user-defined custom path variables are not stored as project settings, but as global IDE settings. Once configured, such path variables will have the same value for any project that you open with your instance of IntelliJ IDEA.
Create a new path variable

- Press Control+Alt+S to open the IDE settings and then select Appearance & Behavior | Path Variables .
- Click , enter the name and value of the variable, and click OK to apply the changes.
You can use path variables to specify paths and command-line arguments for external tools and in some run configurations. For more information, refer to Built-in IDE macros.
For example, you can define a path variable that points to the location of some data source (like a CSV file) or a third-party library that is not stored in your project. If you use this path variable in a run configuration that you share with your project, others can define the correct value for this path variable in their environment and be sure that the run configuration will work for them.
Refer to the variable as $var_name$ in fields and configuration files that accept path variables.
IntelliJ IDEA also has the following built-in path variables:
The current user’s home directory.
The current project’s root directory.
The current module’s root directory.
The directory with the current module’s .iml file.
Ignore path variables
Whenever you open or update a project, IntelliJ IDEA checks for unresolved path variables. If the IDE detects any, it will ask you to define values for them. If you are not going to use files or directories with the unresolved path variables, you can add them to the list of ignored variables.
You can also use the list of ignored variables when a program argument passed to the run/debug configuration has the same format as a path variable (for example, an environment variable).
- Press Control+Alt+S to open the IDE settings and then select Appearance & Behavior | Path Variables .
- Add the names that IntelliJ IDEA shouldn’t consider to be path variables to the Ignored Variables field.
- Click OK to apply the changes.
Path Variables
Revert path variables and the list of ignored variables to their initially saved states.
This field shows the name of a path variable (readonly).
This field shows the value of a path variable (readonly).
Create a new path variable.
Edit the selected path variable.
Delete the selected path variable.
List the names of the variables that should be ignored. Use semicolons ; to separate the list items.
Add / Edit Variable dialog
Specify the path variable name.
Specify the path variable value. Use Shift+Enter to select the necessary file or folder in the Select Path dialog .
Example: creating a new path variable
You may have a library that is located outside your project directory. This library is attached to your project, and the path to this library is included in the .iml file of your project. However, this path should not be absolute, because the location on this library may be different on your teammates’ computers. In this case, you can create the PATH_TO_LIB variable:
- Press Control+Alt+S to open the IDE settings and then select Appearance & Behavior | Path Variables .
- Click .
- In the Add Variable dialog, type the PATH_TO_LIB variable, and its value that points to the library location on your disk.
- Share the .iml file through your version control system.
- After your teammates update their projects from VCS, they will change the PATH_TO_LIB variable value so that it points to the library location on their computers.
Configure a pipenv environment
Pipenv is a tool that provides all necessary means to create a virtual environment for your Python project. It automatically manages project packages through the Pipfile file as you install or uninstall packages.
Pipenv also generates the Pipfile.lock file, which is used to produce deterministic builds and create a snapshot of your working environment. This might be particularly helpful for security sensitive deployment, when project requirements and packages versions are critical. For more information about pipenv, refer to the project documentation at pipenv.pypa.io.
To use pipenv with PyCharm, you need to implement several preparation steps.
Install pipenv

- Run the following command to ensure you have pip installed in your system: $ pip —version You should expect to receive a system response indicating the pip version. If no pip is discovered, install it as described in the Installation Instructions. Alternatively, you can download and install Python from http://python.org.
- Install pipenv by running the following command: $ pip install —user pipenv When installation completes, you will see the following message:
- For your convenience, you might add the user base’s binary directory to your PATH environmental variable. If you skip this procedure, PyCharm will prompt you to specify the path to the pipenv executable when adding a pipenv environment.
- Run the following command: $ py -m site —user-site A sample output can be: C:\Users\jetbrains\AppData\Roaming\Python\Python37\site-packages
- Replace site-packages with Scripts in this path to receive a string for adding to the PATH variable, for example: $ setx PATH «%PATH%;C:\Users\jetbrains\AppData\Roaming\Python\Python37\Scripts» Running the above command in PowerShell will overwrite the user PATH variable. To avoid that, use $ setx PATH «$env:PATH;C:\Users\jetbrains\AppData\Roaming\Python\Python37\Scripts» instead. However, you should keep in mind that this command has a side effect of duplicating the content of the system PATH variable in the user PATH variable. For more information about managing environment variables in PowerShell, refer to the PowerShell documentation.
- Run the following command to find the user base’s binary directory: $ python -m site —user-base An example of output can be /Users/jetbrains/.local (macOS) or /home/jetbrains/.local (Linux)
- Add bin to this path to receive a string for adding to the ~/.bashrc file, for example: $ export PATH=»$PATH:/Users/jetbrains/.local/bin»
- Run the following command to make the changes effective: $ source ~/.bashrc
- Ensure you have enabled bashrc in your bash_profile .
At any time you can alter the specified path to the pipenv executable in the project settings. In the Settings dialog ( Control+Alt+S ), navigate to Tools | Python Integrated Tools , and type the target path in the Path to Pipenv executable field.
After the preparation steps are done, you can use pipenv to create a virtual environment for new or existing projects.
You can also set up pipenv for any of your earlier created projects.
Configure pipenv for an existing Python project
- Do one of the following:
- Click the Python Interpreter selector and choose Add New Interpreter .
- Press Control+Alt+S to open Settings and go to Project: | Python Interpreter . Click the Add Interpreter link next to the list of the available interpreters.
- Click the Python Interpreter selector and choose Interpreter Settings . Click the Add Interpreter link next to the list of the available interpreters.
- Select Add Local Interpreter .
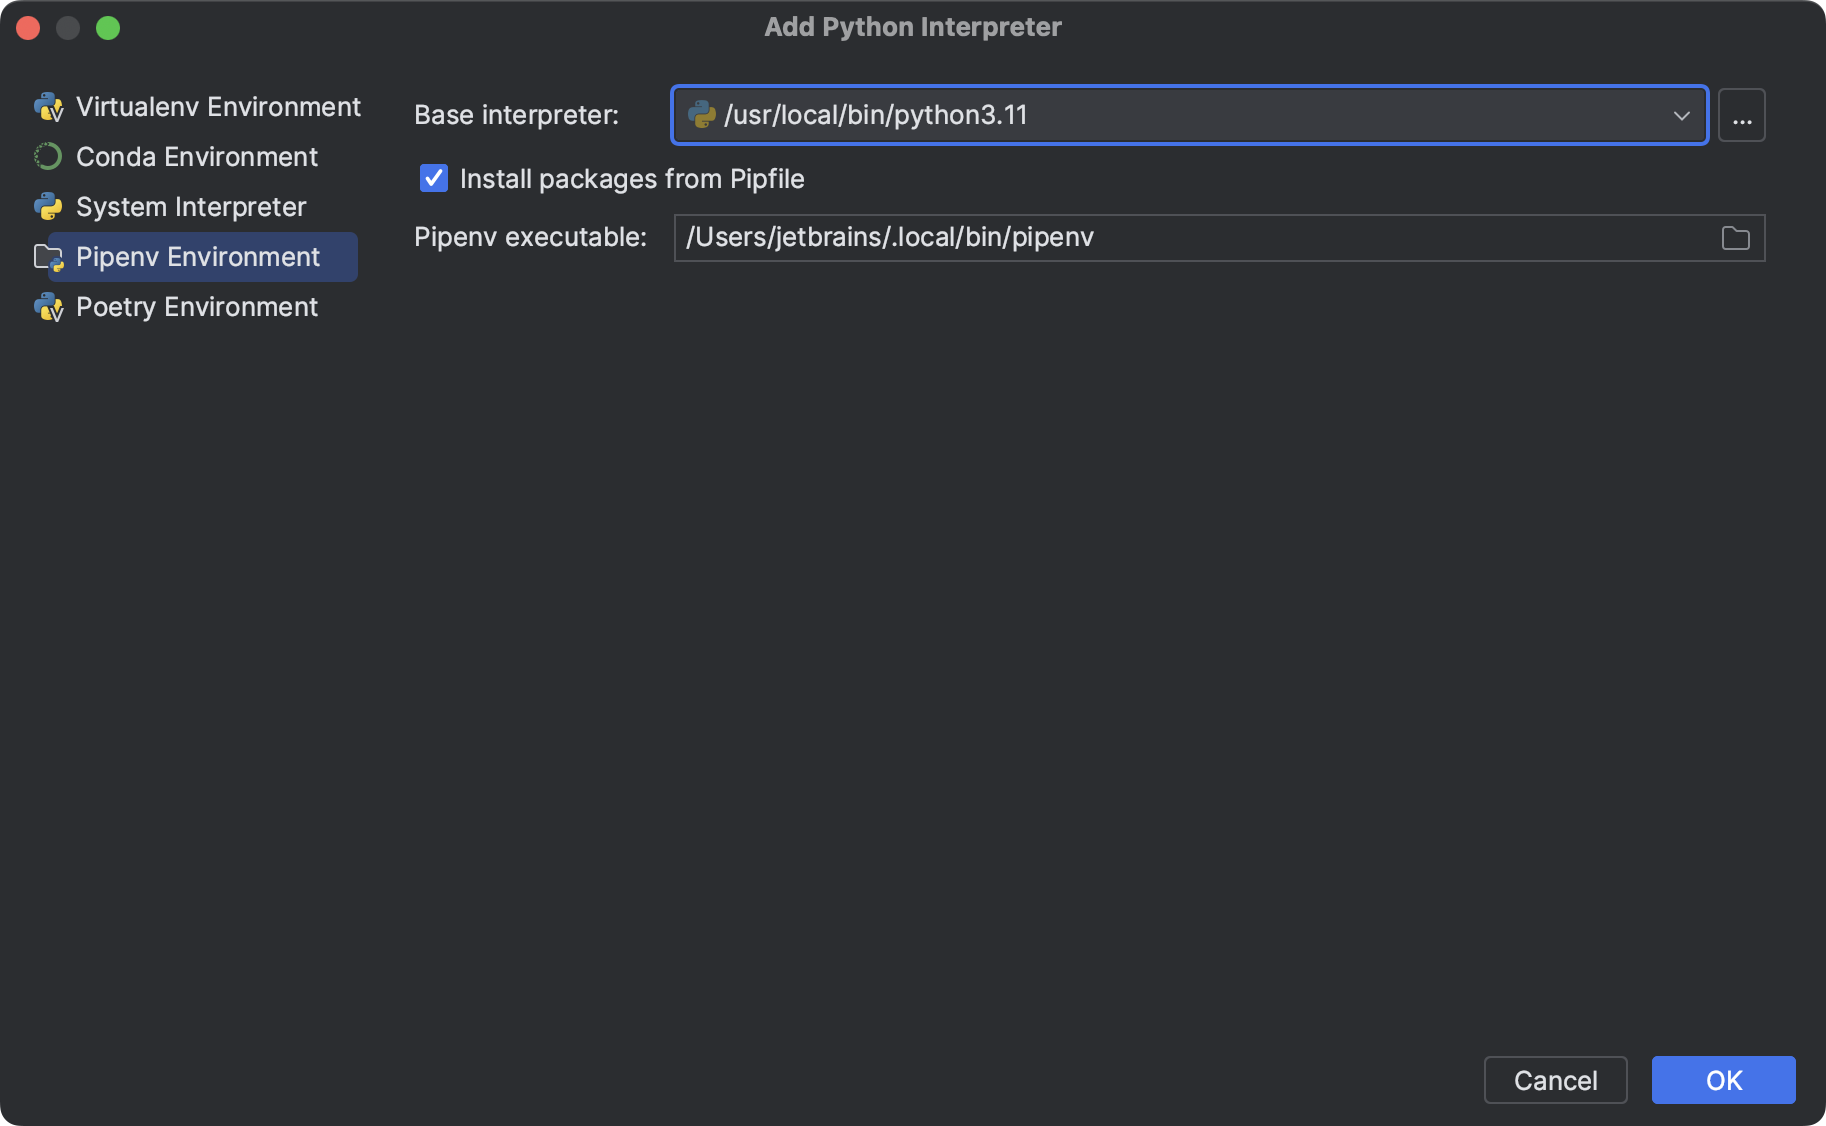
- In the left-hand pane of the Add Python Interpreter dialog, select Pipenv Environment .
- Choose the base interpreter from the list, or click and find the desired Python executable in your file system.
- If your project contains Pipfile , you can choose whether you want to install the packages listed in it by enabling or disabling the Install packages from Pipfile checkbox. By default, the checkbox is enabled.
- If you have added the base binary directory to your PATH environmental variable, you don’t need to set any additional options: the path to the pipenv executable will be autodetected. If the pipenv executable is not found, follow the pipenv installation procedure to discover the executable path, and then specify it in the dialog.
- Click OK to complete the task.
When you have set the pipenv virtual environment as a Python interpreter, all available packages are added from the source defined in Pipfile . The packages are installed, removed, and updated in the list of the packages through pipenv rather than through pip.
PyCharm can create a pipenv environment for your project based on the project requirements recorded in Pipfile.
Create an environment using the Pipfile
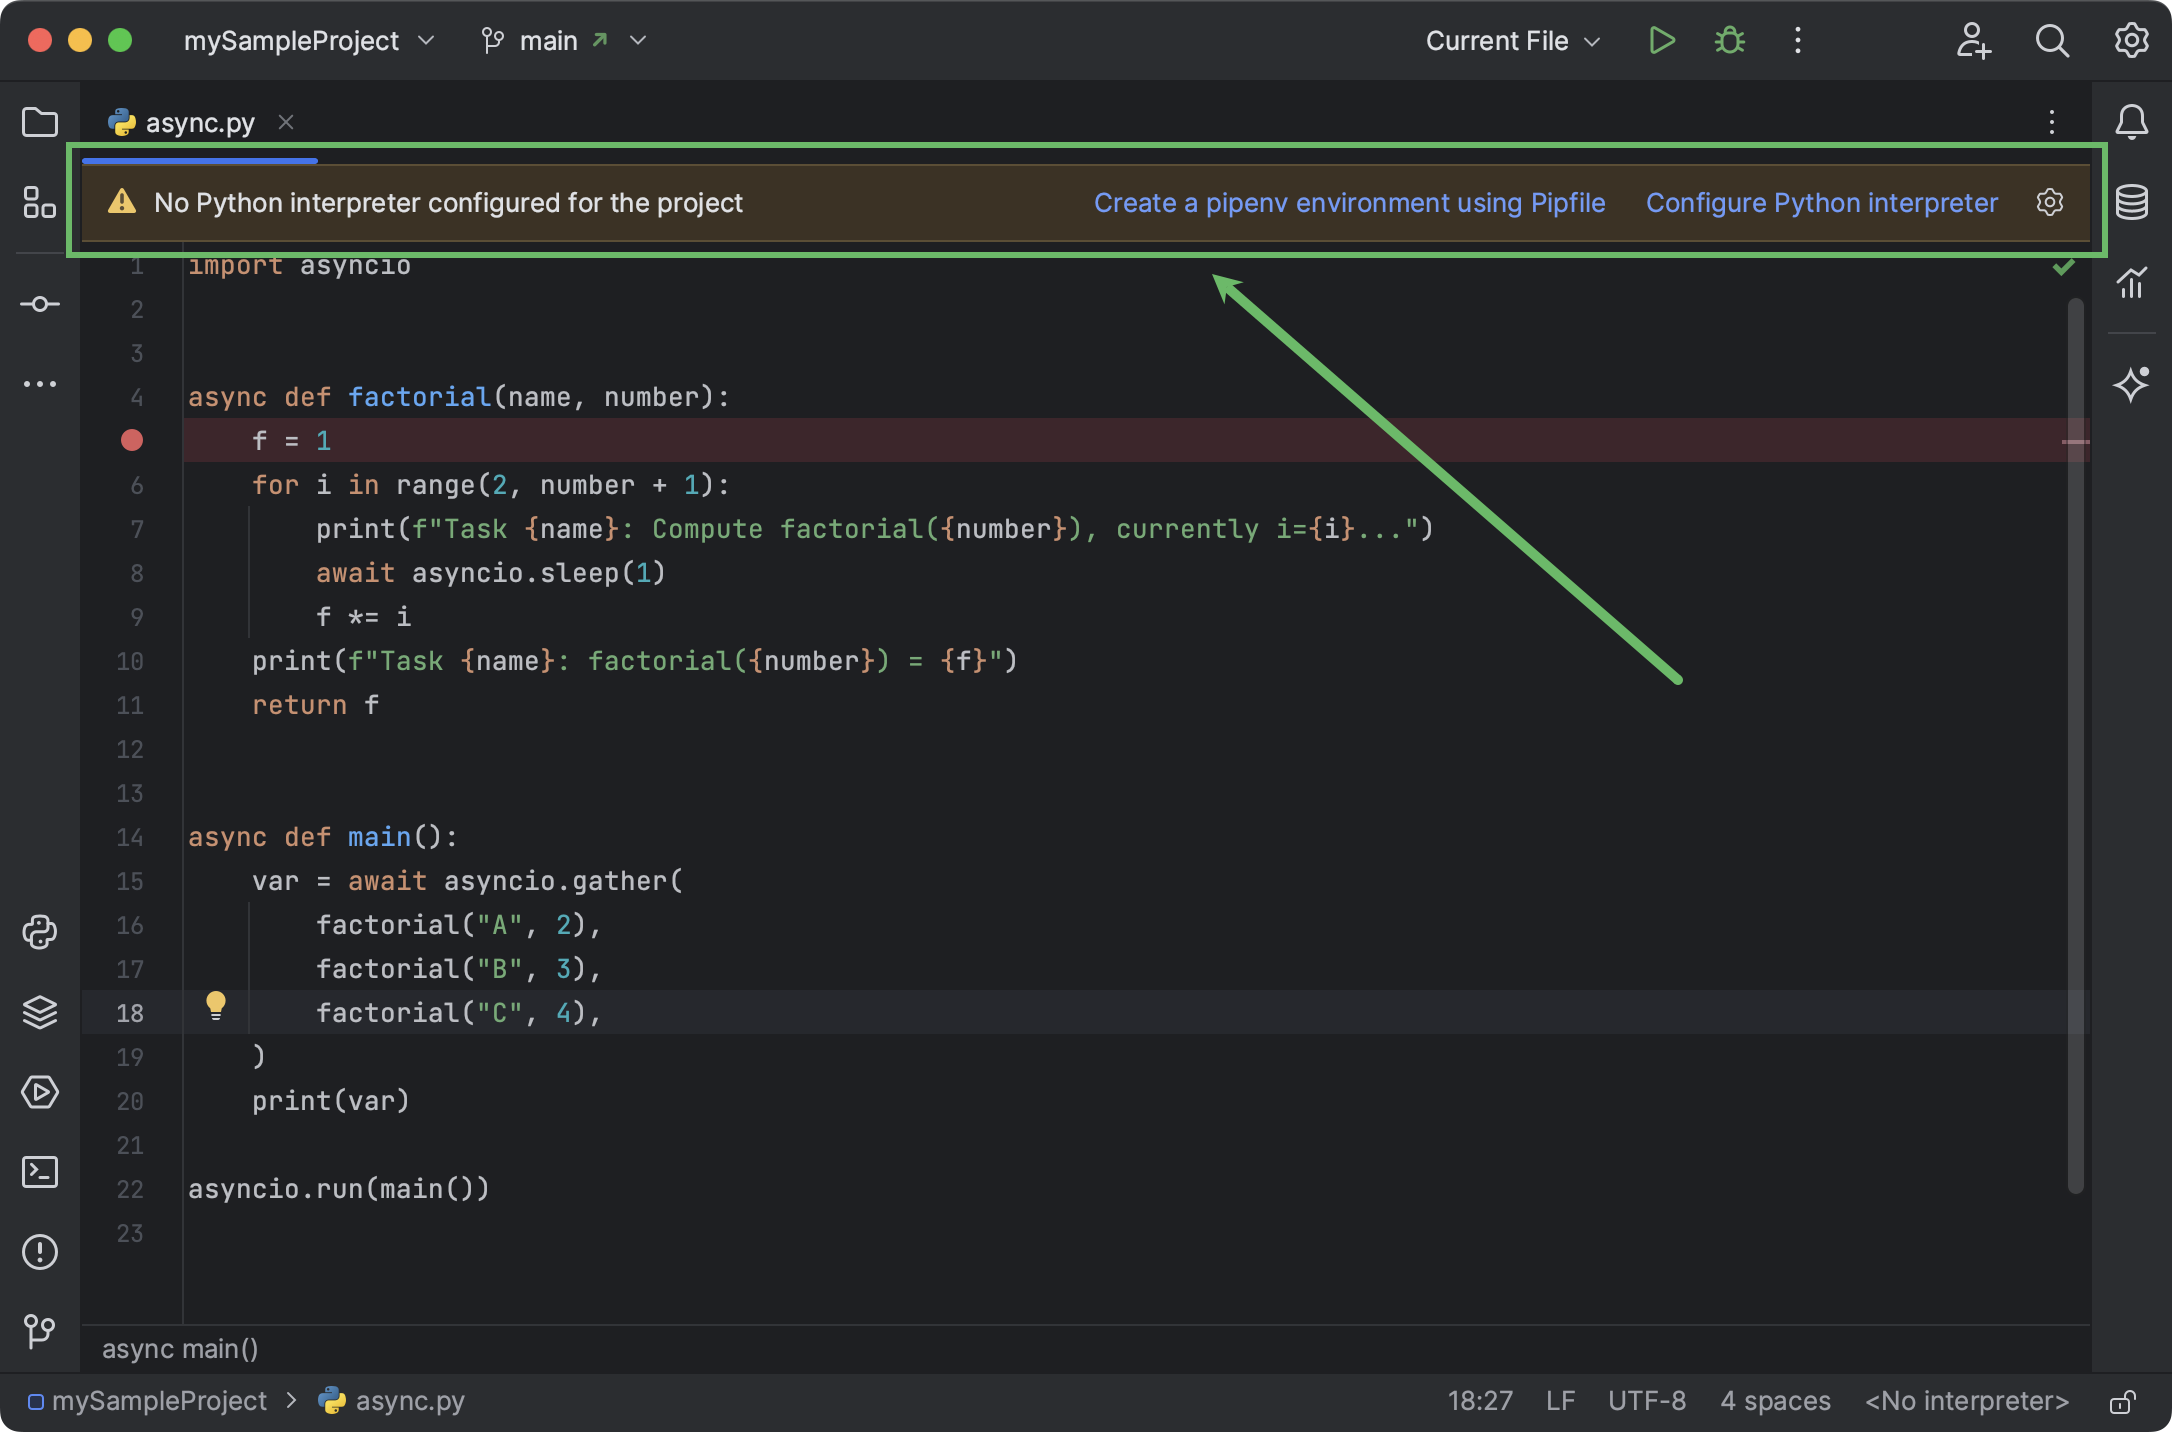
- When you open a project that contains Pipfile , but no project interpreter is configured, PyCharm suggests that you create a pipenv environment.
- Click Create a pipenv environment using Pipfile if you want PyCharm to configure pipenv for you automatically. Alternatively, you can click Configure Python interpreter to follow the standard workflow.
- If PyCharm cannot autodetect the pipenv executable, specify the path to it and click OK .
A new pipenv environment will be configured for your project and the packages listed in Pipfile will be installed.
PyCharm supports environment variables, for example, PIPENV_VENV_IN_PROJECT . You can add PIPENV_VENV_IN_PROJECT=true to your ~/.profile , or ~/.bash_profile or ~/.bashrc and re-login to your OS in order for all the GUI processes to inherit new environment variables from your shell config.
For any of the configured Python interpreters (but Docker-based), you can:
- Manage interpreter paths
- Install, uninstall, and upgrade packages
Для чего нужны настройки «Path Variables» в PhpStorm?
С некоторых пор в PhpStorm в настройках в секции «IDE Settings» есть раздел «Path Variables». Из описания этого раздела в документации я вообщем понял, что там можно заводить некоторые переменные со значением пути на файоловой системе и потом они доступны например как `$LIB_PATH$`. Но вот не понял, где и как можно использовать данные переменные, так как нет понятного примера. Дайте пожалуйста пример их использования. Смутно полагаю, что данная фича для меня окажется полезной.
- Вопрос задан более трёх лет назад
- 5816 просмотров
Комментировать
Решения вопроса 1
Эта настройка нужна для работы в команде. Она позволяет добавить переменную в проект так, чтобы каждый разработчик на своем компьютере мог определить свое значение этой переменной.
Например, есть сторонняя библиотека, которая у каждого разработчика лежит в каталоге с произвольным именем. В проекте заводится PATH VARIABLE с каким-то именем, которое все договорились использовать, и каждый ей в своей среде окружения присваивает нужное значение.
Эта переменная подставляется в путь там, где надо указать путь к библиотеке.
Ответ написан более трёх лет назад
Комментировать
Нравится 1 Комментировать
Ответы на вопрос 0
Ваш ответ на вопрос
Войдите, чтобы написать ответ

- PhpStorm
- +2 ещё
Как при отладке в PhpStorm + XDebug запретить показывать внутренности фреймворка?
- 1 подписчик
- 02 янв.
- 71 просмотр